Red, White and Blue Dirt Cups: A Fun & Festive Dessert for All Occasions!
Hey there, fellow food lovers! 🎉 Are you ready to whip up something that captures the spirit of celebration, whether it’s a backyard barbecue, a Fourth of July gathering, or just a sweet treat to brighten your day? Let’s dive into the wonderful world of Red, White and Blue Dirt Cups! These deliciously layered desserts are not only a feast for your taste buds but also a visually appealing treat that everyone will adore.
Picture this: layers of creamy vanilla pudding intertwined with crushed Oreos, crowned with fresh strawberries, blueberries, and a dollop of whipped cream. They’re the epitome of nostalgia for many of us, reminiscent of childhood birthday parties and school events. The best part? You don’t have to be a master chef to create this delightful dessert—seriously!
I remember the first time I made these dirt cups for a family gathering. My younger cousin was completely mesmerized by the striking layers and the gummy worms peeking out. With wide eyes and a huge grin, she declared them the best dessert ever! It warmed my heart to see everyone digging in and enjoying the flavors. As we savored each spoonful, laughter and conversation flowed, making it a memorable day. That’s the magic of food, isn’t it? It brings people together and creates lasting memories.
You’re going to love how simple it is to create these Red, White and Blue Dirt Cups. Trust me, you’ll have everyone asking for seconds (or even thirds!). Ready to get started? Let’s go!
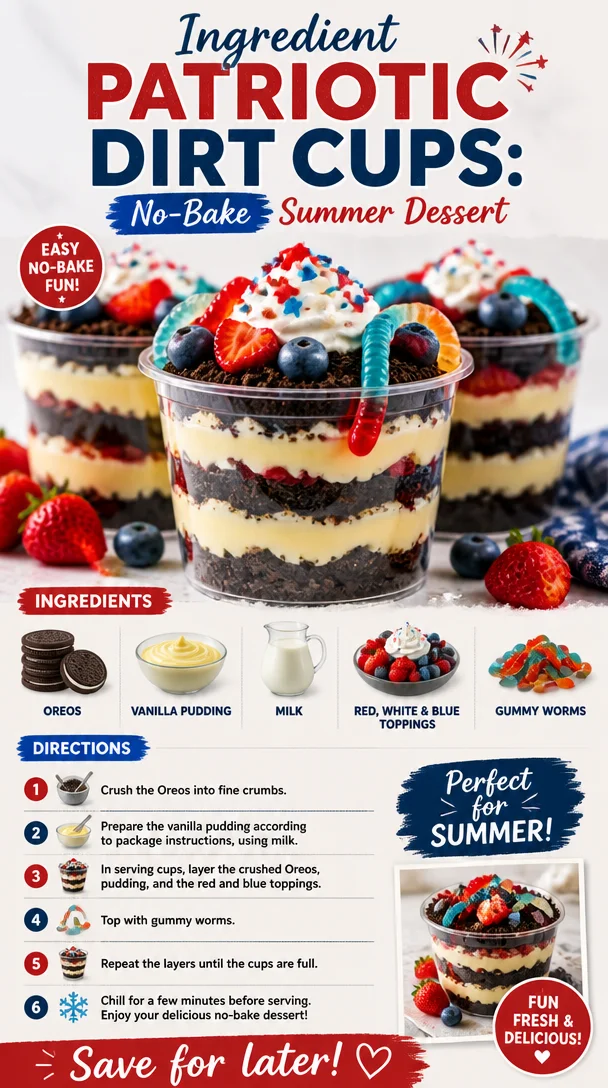
Ingredients
For these delightful Red, White and Blue Dirt Cups, you’ll need the following ingredients:
-
Oreos: These crunchy cookies add a rich, chocolatey base to your dessert. Don’t hesitate to use gluten-free options if you’re catering to dietary restrictions!
-
Vanilla pudding: This creamy, dreamy filling holds everything together. You can opt for instant pudding mix if you’re short on time or make a homemade version for an extra touch of love.
-
Milk: Essential for mixing up that pudding! Use whole milk for a richer taste, or feel free to substitute with almond or oat milk for a dairy-free option.
-
Strawberries: Fresh and vibrant, they add a fruity sweetness that pairs perfectly with the chocolate and cream. For a twist, try raspberries or even diced peaches!
-
Blueberries: These little gems not only bring vibrant color but also a sweet and tangy flavor. If fresh isn’t available, frozen blueberries work just fine—just thaw and drain before using.
-
Whipped cream: This fluffy topping is the cherry on top—literally! Whip up your own using heavy cream, or grab a can of store-bought for convenience.
-
Gummy worms: The fun and whimsical touch! They peek out from the cups and add a playful element that kids (and adults) will love. Choose organic or sugar-free versions if you’re looking for healthier options.
Now that we’ve got our ingredients down, let’s chat about how to put these layers of happiness together!
Step-by-Step Instructions
-
Crush the Oreos: Start by placing your Oreos in a large resealable bag. Seal it tightly (letting out as much air as you can) and smash them with a rolling pin, or use a food processor for a finer texture. You want a mix of larger chunks and fine crumbs, bringing that satisfying crunch. Chef Tip: If you’d like to add a little more fun, mix in some chocolate sprinkles with the Oreo crumbs for extra flair!
-
Prepare the vanilla pudding: In a large mixing bowl, combine your instant pudding mix with milk. Follow the package instructions but whisk it until it’s thick and creamy. You’re looking for silky smoothness here, so don’t skimp on the mixing! Chef’s Note: If you’re feeling adventurous, try adding a splash of vanilla extract for a deeper flavor!
-
Layer it up: Grab clear cups or dessert bowls to showcase those pretty layers. Start with a spoonful of crushed Oreos as your base, creating that classic ‘dirt’ look. Follow this with a layer of vanilla pudding—maybe half the cup’s height. Ensure it’s smooth for that great aesthetic. Repeat these layers, ending with a generous scoop of pudding on top.
-
Add the toppings: Time to decoratively layer on the strawberries and blueberries! Arrange them atop the pudding, letting them cascade down the sides ever-so-nicely. Finish your cups with a fluffy cloud of whipped cream. Chef Hack: Pipe the whipped cream using a pastry bag for a more elegant presentation!
-
Add the gummy worms: Gently place gummy worms on top of the whipped cream, letting them “wiggle” into the layers. They should look like they’re having a blast climbing up the dessert! Fun Idea: For added novelty, let the kids personalize their cups with extra candy and toppings.
-
Chill and serve: Place your completed dirt cups in the fridge for at least 30 minutes. This allows the flavors to meld together and the layers to set slightly. When it’s time to serve, simply pull them out and watch the smiles light up!
-
Enjoy: Dig into those deliciously festive dirt cups, and savor the sweetness of every layer!
Serving Suggestions
Present these Red, White and Blue Dirt Cups on a colorful platter to brighten up your table. You can even add patriotic-themed decorations, like small flags or red, white, and blue napkins! If you’re feeling extra festive, consider serving them with some themed drinks, like homemade lemonade or sparkling berry-infused water. Trust me; they’ll be a hit!
Recipe Variations
-
Chocolate Delight: Replace half of the vanilla pudding with chocolate pudding for a double-layer surprise.
-
Banana Split Cups: Add sliced bananas in between the layers and sprinkle some nuts for crunch!
-
Tropical Twist: Substitute berries with diced mango and pineapple for a fresh summery taste.
-
Sugar-Free Version: Use sugar-free vanilla pudding and lower-sugar Oreos for a lighter dessert option without sacrificing flavor.
-
Nut Allergy-Friendly: Use non-dairy whipped topping and substitute candy worms with marshmallows or freeze-dried fruit.
Chef’s Notes
Oh, the tales I could tell! These dirt cups have been a staple in my kitchen since I can remember. I’ve watched my family go from “What’s in that?” to “Can you make it again?” It’s funny how a simple dessert can spark joy and memories. Over the years, I’ve adjusted the recipe to adapt to seasons and seasons of life. Each time, it turns into a new beautiful tradition. It’s living proof that even the simplest of recipes can come loaded with love!
FAQs and Troubleshooting
Q: Can I make these ahead of time?
A: Absolutely! Just assemble your cups but hold off on adding the whipped cream and fruit toppings until you’re ready to serve them. They’ll stay fresh in the fridge for up to 24 hours.
Q: What if I don’t have clear cups?
A: No worries! Any small bowls or even mason jars work wonderfully. Just remember, the layers are key to the dessert’s appeal, so keep those in mind!
Q: How do I prevent the strawberries from getting mushy?
A: It’s essential to wash and dry the strawberries before cutting. You can also place them on the dessert just before serving to keep them fresh.
Q: Can I substitute the pudding with something else?
A: Definitely! If you’re looking for a dairy-free alternative, use coconut cream mixed with a bit of sweetener and vanilla for a delightful twist.
Nutritional Info (Optional)
While these Dirty Cups are meant to be enjoyed, it’s nice to be mindful of nutrition! Each cup contains roughly 250 calories, 10g of fat, 38g of carbohydrates, and 4g of protein (calories may vary based on ingredient specifics). Serve them as a treat in moderation and savor every layer!
There you have it! Your guide to creating delicious Red, White and Blue Dirt Cups that are sure to bring joy and sweetness. Now it’s your turn to let your creativity shine in the kitchen. Don’t forget to grab your favorite people and share in the joy of food—you never know what lasting memories you might create! Happy baking! 🍰💖
PrintRed, White and Blue Dirt Cups

A fun and festive dessert featuring layers of creamy vanilla pudding, crushed Oreos, fresh strawberries, blueberries, and whipped cream.
- Prep Time: 15 minutes
- Cook Time: 0 minutes
- Total Time: 45 minutes
- Yield: 4 servings 1x
- Category: Dessert
- Method: No-Cook
- Cuisine: American
- Diet: Vegetarian
Ingredients
- 1 package Oreos
- 1 package vanilla pudding mix
- 2 cups milk
- 1 cup strawberries, chopped
- 1 cup blueberries
- 1 cup whipped cream
- Gummy worms
Instructions
- Crush the Oreos in a resealable bag or food processor until you have a mix of larger chunks and fine crumbs.
- Prepare the vanilla pudding by mixing the instant pudding mix with milk according to package instructions until thick and creamy.
- Layer the dessert by adding spoonfuls of crushed Oreos as the base, followed by layers of vanilla pudding, ensuring a smooth appearance.
- Add the fresh strawberries and blueberries on top of the pudding, finishing with whipped cream.
- Place gummy worms on top of the whipped cream for decoration.
- Chill the cups in the fridge for at least 30 minutes before serving.
- Enjoy the delicious layers of your festive dirt cups!
Notes
Feel free to customize these cups with different fruits or pudding flavors. Hold off on the whipped cream and fruit toppings if making ahead of time.
Nutrition
- Serving Size: 1 cup
- Calories: 250
- Sugar: 15g
- Sodium: 300mg
- Fat: 10g
- Saturated Fat: 5g
- Unsaturated Fat: 4g
- Trans Fat: 0g
- Carbohydrates: 38g
- Fiber: 2g
- Protein: 4g
- Cholesterol: 15mg
Keywords: Red, White and Blue, Dirt Cups, Dessert, Patriotic Dessert, No-Cook Dessert