
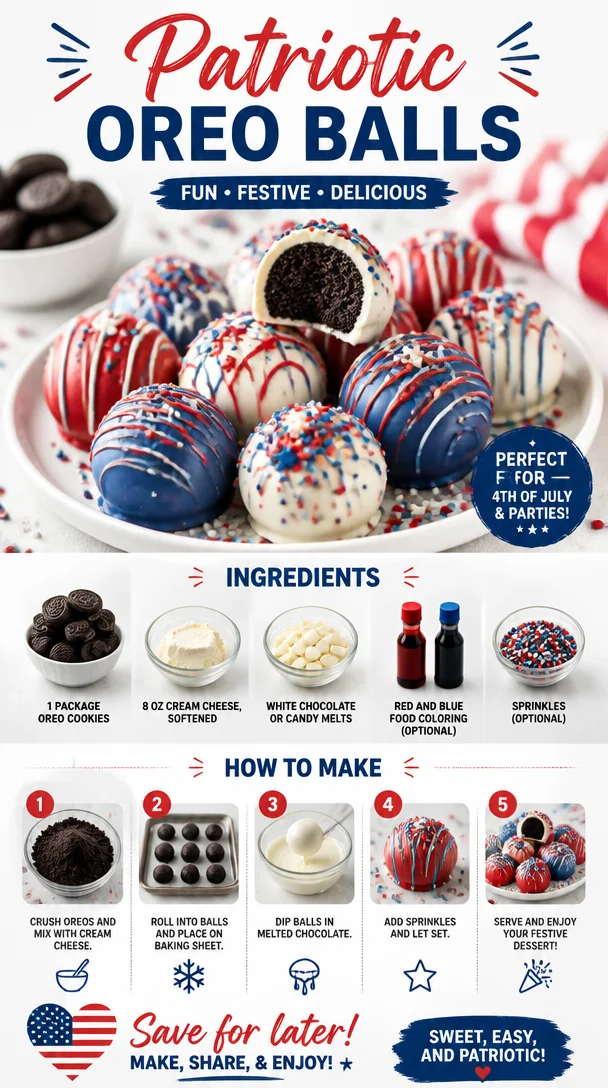
Indulge in Patriotic Oreo Balls: A Delicious Treat for Every Celebration!
Hey there, fellow food lovers! It’s Sophie from PureProteinBites, and let me tell you, today we’re diving into something special that’s not just delicious but also a fun celebration of colors! Are you ready to create some Patriotic Oreo Balls that are absolutely perfect for any holiday festivity? Whether you’re firing up the grill for a backyard barbecue, celebrating Independence Day, or just want to add a little sparkle to your dessert table, these little bites of joy will have everyone reaching for seconds!
Now, let’s be real, we’ve all had those moments where we crave something sweet but don’t want to overdo it with complex recipes and excessive calories. That’s where my love for these Oreo balls comes into play. They’re easy to whip up, ridiculously delicious, and can be tailored to fit your celebrations. Plus, they look super festive with a sprinkle of red and blue. Trust me, these beauties taste even better than they look!
In less than 30 minutes, you’ll have a treat that’s all about lazy afternoons, holiday spirit, and a touch of creativity—without the fuss of elaborate baking. Are you excited? Let’s get this ball rolling—literally!
A Sweet Memory in Every Bite
Before we dive into the nitty-gritty of making these delicious Patriotic Oreo Balls, let me take you back to one of my favorite childhood moments. Picture a summer day, the sun shining bright, and the air filled with the scent of grilled burgers and hot dogs—classic family picnic vibes. My family would gather in our backyard, and as the afternoon heat dripped down, my mom would bring out her special dessert—Oreo truffles!
Each time she crafted them, it was a small, messy magic show. With my little hands dipped into the chocolate chip bowl and sprinkles everywhere, we’d create our own desserts, festooning them however we wanted. And since we usually made them red, white, and blue for the Fourth of July, it was always a festive affair!
Now, every time I pop one of these Oreo Balls in my mouth, it takes me back to those sun-drenched days filled with laughter, sprinkled chocolate, and grease-stained napkins! The nostalgia makes these Oreo Balls even sweeter, and today, I want to share that happiness with you.
Gather Your Ingredients
Alright, let’s gather the essentials for our delightful Oreo Balls! Here’s what you’ll need:
-
1 package Oreo cookies
These classic chocolate cookies are the star of the show. You can use regular Oreos, or if you’re feeling adventurous, try the seasonal flavors for a unique twist. -
8 oz cream cheese, softened
This creamy goodness is what binds everything together and adds that velvety texture. Don’t have cream cheese? Greek yogurt can work as a lighter substitute! -
White chocolate or candy melts
The coating gives these Oreo balls a beautiful, sweet finish. If you’re aiming for a healthier option, feel free to use dark chocolate instead. -
Red and blue food coloring (optional)
Perfect for that patriotic touch! You don’t have to worry about this if you enjoy the classic look, but it can make your dessert even more festive! -
Sprinkles (optional)
Who doesn’t love sparkly sprinkles? Add them for fun and to make these Oreo Balls pop with color!
Step-by-Step Instructions
Let’s get cooking! Follow these steps to whip up your very own Patriotic Oreo Balls:
-
Crush those Oreos!
Grab a large sealable plastic bag, toss in your package of Oreos, and crush them to your heart’s content using a rolling pin. Aim for fine crumbs, making sure there are no large chunks left behind. This step is where you can unleash any kitchen frustrations! -
Mix it Up!
In a mixing bowl, combine your Oreo crumbs with the softened cream cheese. Use a spatula or your hands (yes, it’s okay to get a little messy!) to blend everything together until it forms a cohesive dough. If it’s too crumbly, add an extra scoop of cream cheese. -
Roll ‘Em!
Using your hands, form small balls about 1 inch in diameter and place them on a baking sheet lined with parchment paper. It’s super therapeutic, and you can even get your kids involved in this step! -
Chill, Chill, Chill!
Pop the tray into the freezer for about 15-20 minutes. This helps firm them up, making them easier to coat in chocolate. -
Melt and Color (if you wish)!
While the balls are chilling, melt your white chocolate or candy melts in a microwave-safe bowl in 30-second intervals, stirring in between until smooth. Once melted, you can add a few drops of red and blue food coloring to tinkering it for that lovely patriotic touch! -
Coat the Balls!
Dip each chilled Oreo ball in the melted chocolate, using a fork to help guide it in and out of the mix. Let any excess chocolate drip off before placing them back on the parchment paper. -
Sprinkle!
While the coating is still wet, add your fun sprinkles to each ball for that festive kick. -
Final Chill!
Place them back in the fridge for another 30 minutes to allow the coating to set. Then, you’ll be all set to enjoy these mouth-watering treats!
Serving Suggestions
When it’s time to serve, I love to arrange these colorful Oreo Balls in a festive bowl or on a dessert platter. You can even display them on a tiered stand to add a touch of elegance to your table! The fun colors make these treats a fantastic centerpiece for parties.
Recipe Variations
Feeling adventurous? Here are a few creative twists to make the most of your Oreo Balls:
-
Minty Fresh: Add a few drops of peppermint extract to the cream cheese mixture for a refreshing mint chocolate flavor.
-
Peanut Butter Bliss: Swap in a peanut butter-flavored Oreo and mix a bit of creamy peanut butter into the cream cheese for a rich twist.
-
Nutty Delight: Roll them in crushed nuts, like almonds or walnuts, instead of sprinkles for added texture and flavor.
-
Chocolate Lovers: Use chocolate Oreos and milk chocolate instead of white chocolate for an intense chocolate experience.
-
Vegan Option: Substitute cream cheese with a vegan cream cheese or cashew cream for a vegan-friendly treat.
Chef’s Notes
Making Oreo Balls is truly one of those surprisingly simple yet rewarding kitchen adventures. Over the years, I’ve experimented with flavors, and I can confidently say that these little bites of delight never go out of style. I’ve swapped Oreos for other cookie varieties, tried different kinds of chocolate, and even made seasonal shapes with cookie cutters.
And let me share a funny kitchen story: There was the time I tried making these for a gathering and ended up wearing half the sprinkles on my shirt instead of on the Oreo Balls! We all had a good laugh, and honestly, my friends loved the balls so much, they didn’t even care about the mess!
FAQs and Troubleshooting
1. What do I do if my Oreo balls are too crumbly?
If your mixture is crumbly, it likely needs more cream cheese. Start by adding small amounts until it binds together nicely.
2. How can I prevent the chocolate coating from cracking?
Be sure the chocolate is fully melted and smooth when coating the balls. A quick chill in the fridge after rolling them helps too.
3. How long will these Oreo Balls last?
In an airtight container in the refrigerator, these little delights can stay fresh for up to a week. If they last that long!
4. Can I freeze these?
Absolutely! They freeze wonderfully. Just make sure to store them in an airtight container, and they’ll keep for several months—though I doubt they’ll last that long!
Whether you’re gearing up for a summer barbecue, celebrating a special occasion, or simply want to treat yourself, these Patriotic Oreo Balls are perfect for any gathering. With easy-to-find ingredients, simple steps, and a sprinkle of your favorite colors, you’re all set to impress your family and friends.
So roll up your sleeves, crush those Oreos, and let’s make some sweet memories together! Happy cooking, friends!
Remember, eat well, be happy, and keep those kitchen experiments going! Love you all!
— Sophie 💫
PrintPatriotic Oreo Balls

Indulge in these festive and delicious Patriotic Oreo Balls, perfect for any holiday celebration!
- Prep Time: 15 minutes
- Cook Time: 30 minutes
- Total Time: 45 minutes
- Yield: 4 servings 1x
- Category: Dessert
- Method: No Bake
- Cuisine: American
- Diet: Vegetarian
Ingredients
- 1 package Oreo cookies
- 8 oz cream cheese, softened
- White chocolate or candy melts
- Red and blue food coloring (optional)
- Sprinkles (optional)
Instructions
- Crush those Oreos! Grab a large sealable plastic bag, toss in your package of Oreos, and crush them to your heart’s content using a rolling pin.
- Mix it up! In a mixing bowl, combine your Oreo crumbs with the softened cream cheese.
- Roll ’em! Using your hands, form small balls about 1 inch in diameter and place them on a baking sheet lined with parchment paper.
- Chill, chill, chill! Pop the tray into the freezer for about 15-20 minutes.
- Melt and color (if you wish)! Melt your white chocolate or candy melts in a microwave-safe bowl in 30-second intervals.
- Coat the balls! Dip each chilled Oreo ball in the melted chocolate, using a fork to help guide it in and out of the mix.
- Sprinkle! While the coating is still wet, add your fun sprinkles to each ball.
- Final chill! Place them back in the fridge for another 30 minutes to allow the coating to set.
Notes
These Oreo Balls can be customized with different flavors and colors for a fun twist.
Nutrition
- Serving Size: 1 serving
- Calories: 200
- Sugar: 20g
- Sodium: 150mg
- Fat: 8g
- Saturated Fat: 4g
- Unsaturated Fat: 2g
- Trans Fat: 0g
- Carbohydrates: 25g
- Fiber: 1g
- Protein: 2g
- Cholesterol: 15mg
Keywords: Oreo Balls, Patriotic Dessert, Easy Dessert Recipe, No Bake Dessert, Holiday Treats