
The Ultimate Whipped Cream Decorated Yellow Cake Recipe
Hey there, fellow foodies! If you’ve stumbled upon this post, it means you’re looking for a little sweetness in your life — and oh boy, do I have just the thing for you! Today, we’re diving into the wonderful world of baking with a delightful Whipped Cream Decorated Yellow Cake.
There’s something magical about the combination of fluffy yellow cake, velvety whipped cream, and a sprinkle of creativity. Whether it’s for a birthday, a special occasion, or just because you deserve a treat, this cake is bound to bring smiles and maybe a happy tear or two.
Introduction
You know, baking can be a bit like chemistry. You measure and mix to create something delicious, but it’s also an art form! I’ll never forget the first time I embarked on my baking journey. I was just a kid excited to help my grandma in the kitchen. The smell of vanilla wafting through the air as we prepared our secret family recipe is something I cherish. It felt like magic! That aromatic cloud of happiness enveloping us fueled my passion for baking, creating, and most of all, sharing.
This Whipped Cream Decorated Yellow Cake is an extension of that nostalgic joy. It takes me back to those moments spent with my grandma, eagerly waiting for the cakes to rise in the oven and then diving into the whipped cream like it was pure happiness.
One of the best things about this cake is its simplicity. You don’t need to be a master baker to whip it up; just a little patience and the willingness to get your hands a bit messy! I’ve poured my heart into perfecting this recipe, balancing the sweet and buttery notes of the cake with the airy freshness of the whipped cream. You’ll find that this cake doesn’t just look beautiful; it tastes divine too! Ready to create something that feels like a hug in cake form? Let’s get started!
Personal Story
Ah, where do I begin? I remember the day vividly — my 10th birthday. I had all my friends over for a fun little celebration. My grandma had promised me her famous yellow cake, topped with lush whipped cream. As we prepared the cake together, I could hardly contain my excitement; I was bouncing around the kitchen, sneaking tastes of the whipped cream and then giggling when she caught me.
But the best part? The cake was decorated with my favorite candies. I wanted it to be a showstopper, and boy, did it deliver! When I blew out the candles, surrounded by my friends and family, I knew that day was special — but it was the cake that made it unforgettable. I was convinced I could become a professional baker right then and there. While that career didn’t pan out (I’m still quite the enthusiast!), those memories stayed with me and filled my heart with a love for creating decadent desserts.
Fast forward to now, and this Whipped Cream Decorated Yellow Cake recipe is my tribute to that moment. Each slice is filled with nostalgia, a sprinkle of joy, and of course, a generous dollop of whipped cream goodness.
Ingredients
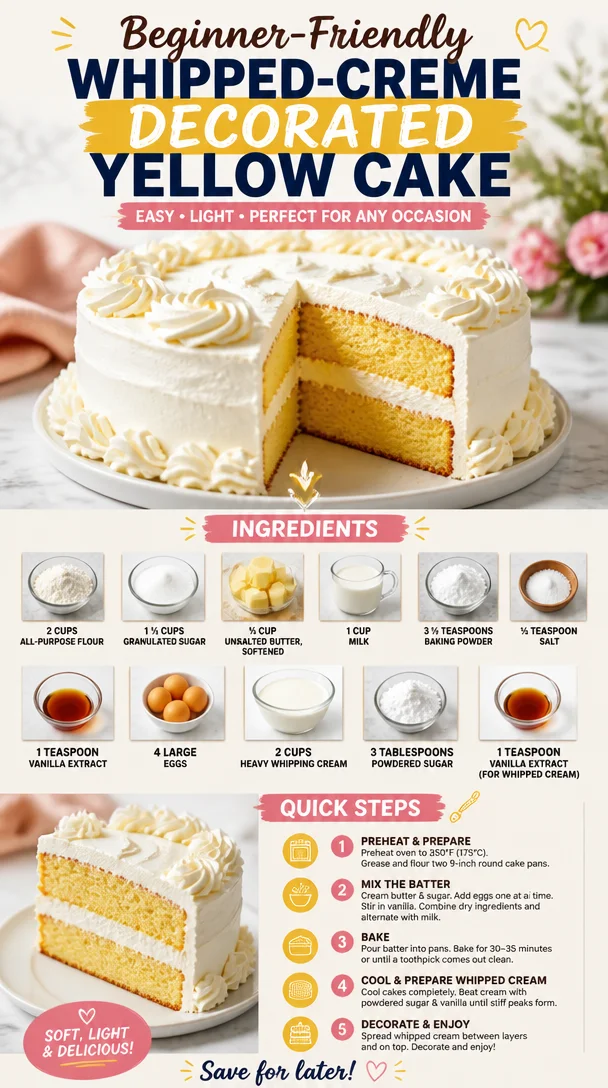
So, let’s gather our ingredients and get baking! Here’s what you’ll need for this delightful cake:
-
2 cups all-purpose flour
- The foundation of our cake! For a gluten-free option, try a 1-to-1 gluten-free flour blend.
-
1 ½ cups granulated sugar
- Sweetness is key! You can substitute coconut sugar for a slight caramel flavor and lower glycemic index.
-
½ cup unsalted butter, softened
- Adds richness and flavor. If you’re dairy-free, coconut oil works wonders as a substitute!
-
1 cup milk
- For moisture and tenderness. Almond or soy milk can seamlessly replace it if preferred.
-
3 ½ teaspoons baking powder
- This is our leavening agent, ensuring the cake rises nicely. Fresh baking powder is key for success!
-
½ teaspoon salt
- A little salt highlights the cake’s sweetness. You can use sea salt for an artisanal touch!
-
1 teaspoon vanilla extract
- For that aromatic kiss of flavor! Feel free to switch it up with almond extract for a different spin.
-
4 large eggs
- Eggs provide structure and richness. If you need a vegan alternative, flax eggs (1 tablespoon ground flaxseed mixed with 2.5 tablespoons water = 1 egg) will do the trick.
-
2 cups heavy whipping cream
- The star of the show for the frosting! Coconut cream is a fantastic dairy-free alternative.
-
3 tablespoons powdered sugar
- Sweetens the whipped cream to perfection! Want it less sweet? Adjust this to your taste.
-
1 teaspoon vanilla extract (for whipped cream)
- A second splash of vanilla love for our heavenly topping!
Step-by-Step Instructions
Now that we have everything prepped, let’s bake! Follow these steps to create your Whipped Cream Decorated Yellow Cake — trust me, it’s easier than it looks!
-
Preheat your oven
- Set your oven to 350°F (175°C). Preheating is crucial for an even bake; no one likes a dense cake!
-
Prepare your cake pans
- Grease and flour two 9-inch round cake pans. If you’re in a pinch and don’t have flour, cocoa powder works well for chocolate cakes too!
-
Mix the dry ingredients
- In a large mixing bowl, whisk together the all-purpose flour, baking powder, and salt. This step ensures everything combines beautifully and prevents clumping!
-
Cream the butter and sugar
- In another bowl, beat the softened butter and granulated sugar until light and fluffy, about 3-5 minutes. This is where magic happens — the fluffiness is the key to a light cake!
-
Add the eggs
- One at a time, add in your eggs, mixing well after each addition. This helps the eggs to incorporate fully and ensures a smooth batter.
-
Mix in the wet ingredients
- Alternate adding the dry mixture with the milk, starting and ending with the flour mix. Make sure it’s just combined — overmixing can lead to a tough cake!
-
Pour and bake
- Distribute the batter evenly between the prepared pans. Bake for 25-30 minutes or until a toothpick comes out clean. Your kitchen will smell divine at this point!
-
Cool down
- Once baked, let the cakes cool in pans for about 10 minutes before transferring them to a wire rack to cool completely. Patience is key here!
-
Prepare the whipped cream
- In a chilled bowl, whip the heavy cream until soft peaks form. Gradually add in the powdered sugar and vanilla extract until stiff peaks form. Look at that heavenly creaminess!
-
Assemble your cake
- Once the layers are cool, place one on a serving platter. Spread a generous layer of whipped cream on top, and then place the second layer on top. Cover the entire cake with the remaining whipped cream. Get creative, my friend!
-
Decorate!
- Feel free to add fresh fruits, chocolate shavings, or edible flowers for that Instagram-worthy finish!
Serving Suggestions
When it comes time to present your masterpiece, slice it with a sharp knife to prevent the layers from collapsing. Serve each slice on a beautiful plate and add a dollop of extra whipped cream on the side. If you’re feeling extra fancy, top it off with some seasonal fruits like strawberries or blueberries for a fresh touch!
Recipe Variations
Want to mix things up? Here are a few variations that’ll inspire your creativity:
- Lemon Zest Yellow Cake: Add the zest of one lemon in the batter for a citrusy kick!
- Chocolate Chip Surprise: Fold in half a cup of mini chocolate chips into the batter before baking for an indulgent twist.
- Nutty Flavor: Incorporate some finely chopped nuts like almonds or pecans into the whipped cream for added crunch.
- Layer it Up: Split the cake layers horizontally and add a layer of fruit jam or custard between them for extra flavor.
- Seasonal Spices: A sprinkle of cinnamon or nutmeg adds warmth and depth to your basic yellow cake!
Chef’s Notes
While this cake recipe has been around for ages, my journey with it evolved as I played with flavors and textures. I fondly remember a mishap where I accidentally added salt instead of sugar in a half-awake moment, and while it was a culinary disaster, it taught me the importance of focus (and checking ingredient labels!).
Now every time I bake, I throw on some upbeat music and just enjoy the process. I urge you to try different elements — embark on your own adventure in baking! Personalize it. After all, it’s all about making memories, and what better way to do that than through the magic of cake!
FAQs and Troubleshooting
1. Why is my cake dense?
- This could be due to overmixing the batter, so be sure to gently fold the ingredients together.
2. How do I store leftover cake?
- Keep it in an airtight container to maintain its moisture. It can also be frozen for up to three months!
3. My whipped cream didn’t whip up. What went wrong?
- Ensure you’re using cold heavy cream and a chilled bowl. Room temperature ingredients won’t create those lovely peaks!
4. Can I use a different type of frosting?
- Absolutely! Cream cheese frosting or buttercream can be perfect alternatives for a richer flavor.
Nutritional Info
While we won’t dive deep into the numbers here (because, let’s be real, this cake is about enjoying life!), each slice typically has a good balance of sweetness and indulgence. Perfect for special occasions while being simple enough to whip up whenever you need!
And there you have it — your guide to baking and decorating a Whipped Cream Decorated Yellow Cake. I can’t wait for you to try this recipe and create your own sweet memories. Happy baking, and remember: stay curious, stay sweet, and most importantly, keep sharing those kitchen stories! 💛
PrintWhipped Cream Decorated Yellow Cake
A delightful yellow cake topped with fluffy whipped cream, perfect for any celebration.
- Prep Time: 20 minutes
- Cook Time: 30 minutes
- Total Time: 50 minutes
- Yield: 8 servings 1x
- Category: Dessert
- Method: Baking
- Cuisine: American
- Diet: Vegetarian
Ingredients
- 2 cups all-purpose flour
- 1 ½ cups granulated sugar
- ½ cup unsalted butter, softened
- 1 cup milk
- 3 ½ teaspoons baking powder
- ½ teaspoon salt
- 1 teaspoon vanilla extract
- 4 large eggs
- 2 cups heavy whipping cream
- 3 tablespoons powdered sugar
- 1 teaspoon vanilla extract (for whipped cream)
Instructions
- Preheat your oven to 350°F (175°C).
- Prepare two 9-inch round cake pans by greasing and flouring them.
- Mix the dry ingredients in a large bowl: flour, baking powder, and salt.
- Cream the butter and sugar together until light and fluffy, about 3-5 minutes.
- Add the eggs one at a time, mixing well after each addition.
- Mix in the wet ingredients, alternating with the dry mixture, starting and ending with the flour mix.
- Pour the batter evenly into the prepared pans and bake for 25-30 minutes.
- Cool the cakes in the pans for about 10 minutes before transferring to a wire rack to cool completely.
- Prepare the whipped cream by whipping heavy cream until soft peaks form, then adding powdered sugar and vanilla extract until stiff peaks form.
- Assemble the cake: place one layer on a serving platter, spread whipped cream on top, add the second layer, and cover with remaining whipped cream.
- Decorate with fruits, chocolate shavings, or edible flowers as desired.
Notes
For a gluten-free option, use a 1-to-1 gluten-free flour blend. Personalize by adding flavors or decorations of your choice!
Nutrition
- Serving Size: 1 slice
- Calories: 400
- Sugar: 25g
- Sodium: 200mg
- Fat: 20g
- Saturated Fat: 10g
- Unsaturated Fat: 8g
- Trans Fat: 0g
- Carbohydrates: 50g
- Fiber: 1g
- Protein: 5g
- Cholesterol: 80mg
Keywords: yellow cake, whipped cream, dessert, baking, celebration cake