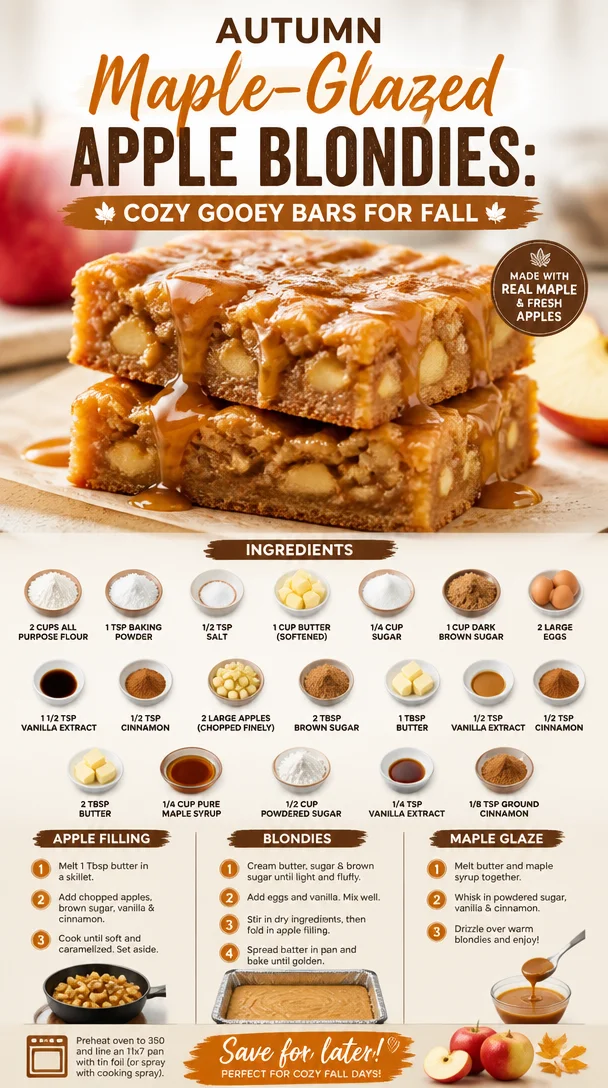
Deliciously Simple Maple Glazed Apple Blondies
Hey there, food lovers! It’s your friend Sophie, coming to you with a delightful recipe that’s sure to become a staple in your kitchen: Maple Glazed Apple Blondies. Picture this: golden, gooey blondies, infused with warm apple goodness, and topped off with a sweet maple glaze. Autumn might be the time we traditionally think of apples, but honestly, these babies are delicious any time of year!
You might be wondering, why blondies? Well, let me tell you a little secret: blondies are like the fun cousin of brownies. They’re rich, they’re chewy, and they embrace all things sweet without diving into that extreme chocolate territory—perfect for when you’re craving something different but oh-so-yummy.
I’ve been playing around with this recipe for a while, and let me tell you, the aroma that fills your kitchen when these are baking is pure magic! Each bite feels like a warm hug—comforting, satisfying, and downright irresistible. Trust me, once you try them, you’ll find yourself reaching for a second (or third, no judgment here!).
So, roll up your sleeves, grab your apron, and let’s make some Maple Glazed Apple Blondies that are easy peasy, delicious, and perfect for sharing—or keeping all to yourself (no one’s watching)! 🍏✨
A Nostalgic Slice of Heaven
I remember the first time I made a version of these blondies, back in my college days. I had a group of friends over for a study night (you know, the ones where we did more snacking than studying). I wanted to impress them with something sweet, but I also wanted to keep it simple—I was notoriously bad at baking. The first batch I made was just a classic blondie recipe, but I decided to toss in some apples I had lying around.
The smell wafting through the kitchen was like the world’s best air freshener! Everyone was crowding around the oven, peeking through the glass door—waiting with bated breath. When I pulled them out and drizzled that maple glaze on top, their eyes lit up. What followed was the best part: the delight of watching my friends dive into those warm, gooey blondies, fully savoring each bite and insisting I should make them every week.
Those memories always warm my heart, reminding me that cooking is more than just mixing ingredients—it’s about sharing joy with those we care about. Now, every time I bake these blondies, I’m taken back to those carefree nights filled with laughter, friends, and delicious treats.
Now, let’s get down to business and make our own batch! Here’s what you’ll need.
Ingredients
-
2 cups all-purpose flour
A classic baking staple, perfect for giving these blondies their chewy texture. You can substitute with whole wheat flour for a heartier bite, but expect a denser blondie. -
1 tsp baking powder
This is what gives your blondies that perfect lift! Be sure it’s fresh for the best rise. -
1/2 tsp salt
Salt is essential to enhance all those sweet flavors. It might seem small, but it does wonders! -
1 cup butter (softened)
Butter gives our blondies that rich, decadent flavor. If you prefer, you can use unsweetened applesauce for a lighter touch, but it will change the texture slightly. -
1/4 cup sugar
A little granulated sugar goes a long way, balancing the sweetness. You can skip this if you want it less sweet. -
1 cup dark brown sugar
The dark brown sugar not only adds sweetness but gives a nice caramel undertone to the blondies. If you don’t have it, light brown sugar can work in a pinch! -
2 large eggs
Eggs provide structure and moisture. You can use flax eggs (1 tbsp of flaxseed meal + 3 tbsp of water) for a vegan alternative. -
1 1/2 tsp vanilla extract
Always use pure vanilla extract when you can! It brings a wonderful depth of flavor to the dish. -
1/2 tsp cinnamon
This adds warmth and coziness to our blondies! Feel free to increase if you’re a cinnamon lover. -
2 large apples (chopped finely)
Apples add sweetness and juiciness. Fuji or Honeycrisp apples are my go-tos for the best flavor. -
2 Tbsp brown sugar
For our apple topping, this will help caramelize those apples. You can use coconut sugar instead for a different twist! -
1 Tbsp butter
To sauté the apples and create that luscious topping. You can use coconut oil for a dairy-free version. -
1/4 cup pure maple syrup
The star of our glaze! Go for the real stuff for a truly rich flavor. -
1/2 cup powdered sugar
This will sweeten our glaze to perfection, giving it that lovely drizzle consistency. -
1/4 tsp vanilla extract
A little more vanilla never hurt anyone, right? It adds depth to our glaze. -
1/8 tsp ground cinnamon
Just a pinch to tie it all together in our lovely glaze.
Step-by-Step Instructions
Step 1: Preheat the Oven
First things first, let’s get that oven preheated to 350°F (175°C). This ensures the blondies bake evenly and gives you a lovely golden crust.
Step 2: Prepare Your Baking Dish
Grab a 9×13-inch baking dish and grease it generously with butter (or line it with parchment paper for easy removal). This helps create those beautiful edges we all love!
Step 3: Mix the Dry Ingredients
In a medium bowl, whisk together the flour, baking powder, salt, and cinnamon. Set this aside because we’re going to mix it with our wet ingredients in a bit. This early step helps to evenly distribute the baking powder.
Step 4: Cream the Butters and Sugars
In a large mixing bowl, beat the softened butter, granulated sugar, and dark brown sugar together until they’re light and fluffy. This usually takes about 2-3 minutes using a hand mixer on medium speed. It’s important to incorporate air into the mixture for that nice fudgy texture!
Step 5: Add the Eggs and Vanilla
Next, beat in the eggs one at a time, followed by the vanilla extract, mixing until everything is well combined. I love the smell of vanilla wafting through the kitchen at this point—so dreamy!
Step 6: Combine Wet and Dry
Gradually add your dry mixture to the wet mixture, mixing just until combined. Be careful not to over-mix—you want to keep that tenderness in your blondies!
Step 7: Fold in the Apples
Now comes the fun part: fold in those finely chopped apples! Make sure they’re evenly distributed throughout the batter so every bite has that juicy apple goodness.
Step 8: Prepare the Apple Topping
In a small skillet, melt 1 tablespoon of butter over medium heat. Add your chopped apples and sprinkle the brown sugar over them. Sauté for about 3-5 minutes until the apples are just tender. This topping creates a lovely layer of flavor and texture on top!
Step 9: Pour and Bake
Pour the blondie batter into your prepared baking dish. Gently spoon the sautéed apples over the top, creating an even layer. Pop it in the oven and let it bake for about 25-30 minutes or until they turn golden brown and a toothpick comes out clean from the center.
Step 10: Make the Maple Glaze
While your blondies are baking, let’s whip up the glaze. In a small bowl, whisk together the maple syrup, powdered sugar, vanilla extract, and ground cinnamon until smooth and drizzly. If it’s too thick, add a splash of milk to thin it down.
Step 11: Drizzle It On
Once your blondies have baked and cooled for about 10 minutes, drizzle that glorious maple glaze on top. Let them cool for an additional 20 minutes so they set up nicely for cutting!
Serving Suggestions
These Maple Glazed Apple Blondies are perfect to serve warm or at room temperature. Slice them into generous squares and enjoy as is, or add a dollop of whipped cream or a scoop of vanilla ice cream on the side for an indulgent dessert! You can even sprinkle with a bit of additional cinnamon for a beautiful finish.
Recipe Variations
- Nutty Addition: Fold in half a cup of chopped walnuts or pecans for an added crunch.
- Spiced Up: Add a pinch of nutmeg or allspice to the batter for an extra kick of flavor.
- Dried Fruit: Toss in some dried cranberries or raisins for a chewy, fruity twist.
- Choco-Mocha: Stir in a handful of chocolate chips for a sweet surprise in every bite!
Chef’s Notes
Every time I bake these blondies, it feels like a mini celebration! I’ve tweaked this recipe countless times, sometimes using different apples or even experimenting with using almond flour for a gluten-free version (it works beautifully, just note you’ll need to adjust the liquid a bit).
And let me tell you, if you find yourself with leftovers (which can be rare around my place), pop them in an airtight container, and they’ll still taste divine for up to three days. But trust me; they won’t last long!
FAQs and Troubleshooting
1. Why did my blondies turn out too dry?
If your blondies are dry, it may be because they were over-baked. Keep an eye on the timer and do the toothpick test—better to underbake slightly than overbake!
2. Can I use different fruit?
Absolutely! Pears or peaches can also work beautifully in this recipe, just remember to chop them finely and slightly adjust baking times if needed.
3. How do I know when they’re done baking?
Look for a golden brown color around the edges and a slightly soft center. A toothpick should come out with a few moist crumbs, not wet batter.
4. Can I freeze these blondies?
Yes! They freeze well. Just wrap them tightly in plastic wrap or foil, then place them in an airtight container. Thaw in the fridge overnight before serving.
Nutritional Info
While I haven’t calculated the exact nutritional info for these blondies, they contain wholesome ingredients and are a great treat as an occasional indulgence. Feel free to enjoy them in moderation!
Thanks for joining me in the kitchen today! I hope you whip up these Maple Glazed Apple Blondies and share them with friends and family. Remember, it’s all about creating delicious memories around the table. Happy baking!
— Sophie 💛
PrintDeliciously Simple Maple Glazed Apple Blondies
Golden, gooey blondies infused with warm apple goodness and topped with a sweet maple glaze.
- Prep Time: 15 minutes
- Cook Time: 30 minutes
- Total Time: 45 minutes
- Yield: 12 servings 1x
- Category: Dessert
- Method: Baking
- Cuisine: American
- Diet: Vegetarian
Ingredients
- 2 cups all-purpose flour
- 1 tsp baking powder
- 1/2 tsp salt
- 1 cup butter (softened)
- 1/4 cup sugar
- 1 cup dark brown sugar
- 2 large eggs
- 1 1/2 tsp vanilla extract
- 1/2 tsp cinnamon
- 2 large apples (chopped finely)
- 2 Tbsp brown sugar
- 1 Tbsp butter
- 1/4 cup pure maple syrup
- 1/2 cup powdered sugar
- 1/4 tsp vanilla extract
- 1/8 tsp ground cinnamon
Instructions
- Preheat the oven to 350°F (175°C).
- Prepare a 9×13-inch baking dish by greasing it with butter or lining it with parchment paper.
- Mix the flour, baking powder, salt, and cinnamon in a bowl and set aside.
- Cream the softened butter, granulated sugar, and dark brown sugar until light and fluffy.
- Add the eggs one at a time, then mix in the vanilla extract.
- Combine the dry mixture with the wet mixture until just combined.
- Fold in the chopped apples evenly into the batter.
- Prepare the apple topping by sautéing chopped apples with butter and brown sugar for 3-5 minutes.
- Pour the blondie batter into the baking dish and add the sautéed apples on top.
- Bake for 25-30 minutes or until golden brown and a toothpick comes out clean.
- Make the maple glaze by whisking together maple syrup, powdered sugar, vanilla extract, and ground cinnamon.
- Drizzle the glaze over the blondies after they have cooled for 10 minutes.
Notes
Slice into generous squares and serve warm or at room temperature. Great with whipped cream or vanilla ice cream.
Nutrition
- Serving Size: 1 blondie
- Calories: 250
- Sugar: 20g
- Sodium: 150mg
- Fat: 12g
- Saturated Fat: 7g
- Unsaturated Fat: 4g
- Trans Fat: 0g
- Carbohydrates: 34g
- Fiber: 1g
- Protein: 3g
- Cholesterol: 40mg
Keywords: Apple, Blondies, Dessert, Maple Glaze, Baking