
Homemade Tart Crust: A Delightful Journey to Flavor Town!
Hey there, fellow food lovers! 🍽️ Today, we’re diving into the world of homemade tart crusts. Have you ever had that moment when you take a bite of a perfectly baked tart, and it completely transports you? For me, that sweet, buttery crunch creates a wave of nostalgia that wraps around my tastebuds like a warm hug. Whether it’s a zesty lemon tart, silky chocolate ganache, or a fresh fruit delight, it all starts with the perfect tart crust.
Now, I won’t lie – the thought of making your own tart crust can seem a little daunting. But trust me when I say, it’s totally worth it! You’re just a few simple ingredients and steps away from mastering this culinary skill. This tart crust is not only delicious and flaky but also super versatile. So roll up your sleeves, and let’s get started on this delightful journey into tart territory!
A Nostalgic Trip Down Memory Lane
Ah, the memories I have of baking with my grandmother! When I was a kid, our weekends often revolved around her cozy kitchen, where the air was filled with the scent of freshly baked goodies. One day, she decided we were going to make a tart for dessert. As we mixed the ingredients, I remember her sweet laugh and the way she always seemed to know just how much flour to sprinkle in when things got sticky.
The crust was the star of the show: buttery, light, and crumbly! After what felt like an eternity of waiting (did I mention I was a very impatient child?), we finally pulled it out of the oven. That first bite? Pure heaven! The sweet tart filling danced atop the flaky crust, sending me straight to dessert paradise. That day sparked my love for baking and has inspired me ever since to create memorable dishes that share a slice of joy—hopefully, my tart crust does the same for you!
Ingredients You’ll Need
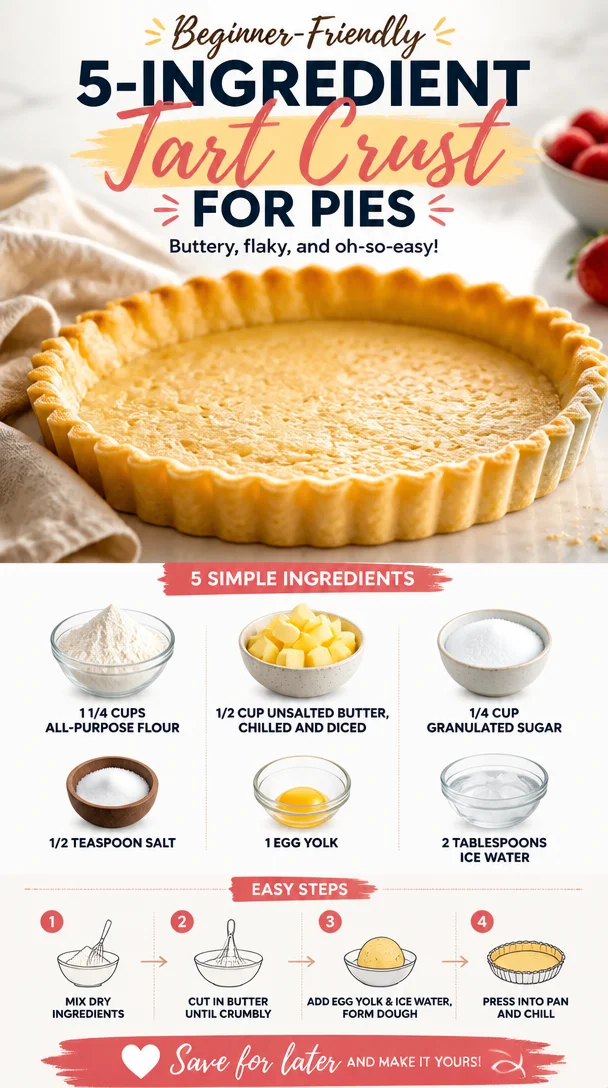
Here’s the ingredient lineup for our homemade tart crust. I promise it’s as straightforward as it gets!
-
1 1/4 cups all-purpose flour: This is the backbone of our crust, providing structure. If you want a gluten-free option, you can substitute it with a gluten-free all-purpose blend!
-
1/2 cup unsalted butter, chilled and diced: Butter is essential for that rich flavor! Make sure it’s cold for the best flaky results. You can swap in vegan butter for a dairy-free option, too.
-
1/4 cup granulated sugar: A touch of sweetness to balance all the flavors. If you’re looking to reduce refined sugar, coconut sugar works well here!
-
1/2 teaspoon salt: A pinch of salt enhances all the other flavors; it’s the secret weapon in most baked goods!
-
1 egg yolk: This acts as a binder, giving the crust a beautiful texture. If you’re vegan or allergic to eggs, you can use a flax egg (1 tablespoon ground flaxseed mixed with 2.5 tablespoons water) as a substitute.
-
2 tablespoons ice water: Water helps bind everything without making the crust tough. Ice water is key for keeping that butter perfect for flakiness!
Step-by-Step Instructions
Alright, let’s get down to business! Making this tart crust is easier than you think. Follow these simple steps, and you’ll be on your way to tart glory in no time!
-
Prep Your Workspace: First things first — gather all your ingredients, a mixing bowl, a fork, and a tart pan. Preheat your oven to 375°F (190°C). A clean workspace means fewer distractions!
-
Mix Your Dry Ingredients: In a large bowl, whisk together the flour, sugar, and salt until well combined. This will ensure even distribution of flavors throughout your crust.
-
Cut in the Butter: Add the chilled, diced butter to your flour mixture. Using a fork or a pastry cutter, cut the butter into the flour until it resembles crumbs. You want some small pea-sized pieces of butter to remain – these will create that flaky texture.
-
Add the Egg Yolk: Incorporate the egg yolk into the mixture, mixing gently. You want to combine everything without overworking the dough—remember, a tender crust is the goal!
-
Incorporate Ice Water: Gradually add the ice water, one tablespoon at a time, until the dough holds together. You might need more or less water depending on humidity—be the judge here!
-
Form the Dough: Turn the mixture onto a lightly floured surface and knead it gently just until it comes together. Shape it into a disk, wrap it in plastic wrap, and refrigerate for at least 30 minutes. This step is crucial for achieving a nice, flaky crust.
-
Roll It Out: Once the dough has chilled, flour your surface lightly again and roll out the dough evenly to about 1/8 inch thick. Don’t worry if it’s not a perfect circle; embrace the rustic vibe!
-
Transfer to Tart Pan: Carefully transfer your rolled-out dough to a tart pan, pressing it gently into the corners. Trim any excess dough, but leave some hanging over the edges, as it may shrink during baking.
-
Pre-Bake the Crust: To prevent a soggy bottom, prick the bottom of the crust with a fork (this is called docking) and place it in the fridge again for 15 minutes. Then, bake it in the preheated oven for 15-20 minutes or until lightly golden. Keep an eye on it!
-
Cool and Fill: Let the crust cool completely before filling it with your chosen tart filling. If you have any leftover dough, roll it out and use cookie cutters for cute decorative shapes on your tart!
Serving Suggestions
Once you’ve filled your tart, there are numerous ways to serve it. A dollop of freshly whipped cream or a scoop of vanilla ice cream pairs wonderfully with fruity tarts. For something classy, consider a sprinkle of powdered sugar on top or a drizzle of chocolate sauce. Present it on a beautiful platter, maybe with some fresh berries or mint leaves for added flair!
Recipe Variations
Feeling adventurous? Here are a few creative twists:
-
Nutty Addition: Swap out a bit of the all-purpose flour for almond flour for a nutty flavor that pairs beautifully with chocolate or fruit fillings.
-
Lemon Zest Twist: Add the zest of one lemon into the dough for a citrusy freshness that complements any sweet filling.
-
Cocoa Crust: For a chocolate twist, substitute 1/4 cup of the flour with cocoa powder. Perfect for chocolate lovers!
-
Herb-Infused: For savory tarts, infuse the dough with dried herbs like thyme or rosemary for a fragrance that transforms your dish.
-
Different Sweeteners: Try maple syrup instead of granulated sugar for a deeper, maple flavor.
Chef’s Notes
This tart crust recipe has been a staple in my kitchen for years! I can remember countless family gatherings, where I’d whip it up to bring a sweet twist to the table. Over time, I’ve played with different fillings, from rich chocolate ganache to seasonal fruits, and it has never disappointed. In fact, one time I accidentally let a tart crust overbake—it turned into a delightful crunchy cookie that the kids loved so much! It taught me that even missteps in the kitchen can lead to delicious discoveries. So don’t stress too much; cooking should be fun and experimental!
FAQs and Troubleshooting
-
Why is my tart crust tough?
The most likely culprit is overworking the dough. Remember, mix just until everything is combined, and you want to handle it as little as possible! -
My crust shrank during baking. What can I do?
This typically happens if the dough isn’t chilled enough. Always refrigerate your crust before baking to help maintain its shape. -
Can I make this crust in advance?
Absolutely! You can prepare the dough ahead of time, wrap it tightly in plastic wrap, and refrigerate for up to a few days. You can even freeze it for up to a month for those unexpected baking cravings! -
What fillings work best?
This crust is incredibly versatile! Fruit fillings like raspberries, lemon curd, or chocolate pastry cream make incredible choices. The sky’s the limit!
Nutritional Info (Optional)
While I always recommend enjoying treats in moderation, here’s a rough breakdown per serving when the crust is divided into 8 portions:
- Calories: 150
- Total fat: 7g
- Saturated fat: 4g
- Carbohydrates: 18g
- Sugar: 2g
- Protein: 2g
Remember, when it comes to desserts, the most important ingredient is joy. So mix in a dash of fun, a sprinkle of creativity, and you’ve got yourself a fantastic homemade tart crust ready to impress your friends and family alike. Happy baking! 💛
PrintHomemade Tart Crust

A delightful and versatile homemade tart crust that is buttery, flaky, and perfect for any filling.
- Prep Time: 15 minutes
- Cook Time: 20 minutes
- Total Time: 35 minutes
- Yield: 8 servings 1x
- Category: Dessert
- Method: Baking
- Cuisine: French
- Diet: Vegetarian
Ingredients
- 1 1/4 cups all-purpose flour
- 1/2 cup unsalted butter, chilled and diced
- 1/4 cup granulated sugar
- 1/2 teaspoon salt
- 1 egg yolk
- 2 tablespoons ice water
Instructions
- Prep your workspace: Gather all your ingredients, a mixing bowl, a fork, and a tart pan. Preheat your oven to 375°F (190°C).
- Mix your dry ingredients: In a large bowl, whisk together the flour, sugar, and salt until well combined.
- Cut in the butter: Add the chilled, diced butter and cut it into the flour mixture until it resembles crumbs.
- Add the egg yolk: Incorporate the egg yolk into the mixture, mixing gently.
- Incorporate ice water: Gradually add the ice water, one tablespoon at a time, until the dough holds together.
- Form the dough: Turn the mixture onto a floured surface and knead gently just until it comes together. Wrap it in plastic wrap and refrigerate for at least 30 minutes.
- Roll it out: Once chilled, roll out the dough evenly to about 1/8 inch thick.
- Transfer to tart pan: Carefully transfer your rolled-out dough to a tart pan, pressing gently into the corners.
- Pre-bake the crust: Prick the bottom of the crust with a fork and refrigerate for 15 minutes. Then, bake for 15-20 minutes or until lightly golden.
- Cool and fill: Let the crust cool completely before filling it.
Notes
You can make the dough ahead of time and refrigerate it for up to a few days or freeze it for a month.
Nutrition
- Serving Size: 1 serving
- Calories: 150
- Sugar: 2g
- Sodium: 100mg
- Fat: 7g
- Saturated Fat: 4g
- Unsaturated Fat: 3g
- Trans Fat: 0g
- Carbohydrates: 18g
- Fiber: 0g
- Protein: 2g
- Cholesterol: 30mg
Keywords: tart crust, pastry, baking, dessert, homemade