
Crafting Your Own Starbucks Cake Pops: A Delicious Adventure!
Hey there, fellow foodies! 🎉 Whether you’re a die-hard Starbucks fan or just love a good sweet treat, I’m thrilled to share my twist on the ever-popular Starbucks Cake Pops. If you’ve ever taken a bite of one of those adorable little spheres of happiness, you know they’re like a perfect hug for your taste buds. But why stop at just savoring them when you can whip up your own version right in your kitchen? Trust me, it’s easier than you think, and it comes with the bonus of being able to customize them to your heart’s desire!
Let’s face it: life can get pretty busy. Between juggling work, family, and trying to squeeze in some “me-time,” cooking often takes a backseat. The good news? Making cake pops at home means you can ensure they’re not just delicious but also pack a nutritious punch! Plus, you get to unleash your inner chef, and who doesn’t love a bit of creative freedom?
In this blog post, I’ll guide you through the simple steps of making your own Starbucks-inspired Cake Pops—from the memories that sparked this sweet cravings to hacks that will make your baking experience as enjoyable as the treats themselves. So grab your apron, and let’s dive into the world of cake pops together!
A Sweet Trip Down Memory Lane
Ah, cake pops! Whenever I think of these delightful little treats, I am transported back to my first-ever visit to a bustling Starbucks. I was feeling a bit overwhelmed that day—life was throwing its usual twists and turns at me—and all I needed was a small crumb of joy to lift my spirits. Enter the cake pop: this tiny ball of fluffy cake and frosting, dressed in a sweet coat of chocolate and adorned with colorful sprinkles. The moment I took that first bite, everything else faded away.
There was something magical about holding that little stick and taking a moment just for myself, savoring each bite as the world outside blurred into sweet oblivion. Fast forward a few years, and I found myself in my kitchen, craving that same nostalgic comfort. Instead of hitting the café, I thought, “Why not bring a slice of that joy to my home?” With some basic ingredients and a sprinkle of creativity, I embarked on a cake pop-making journey that would not only satisfy my sweet tooth but also allow me to create new memories with friends and family.
So, if you’re ready to unlock the secret to making these delectable treats, let’s jump right in!
Ingredients You’ll Need
To start our cake pop adventure, gather the following ingredients:
-
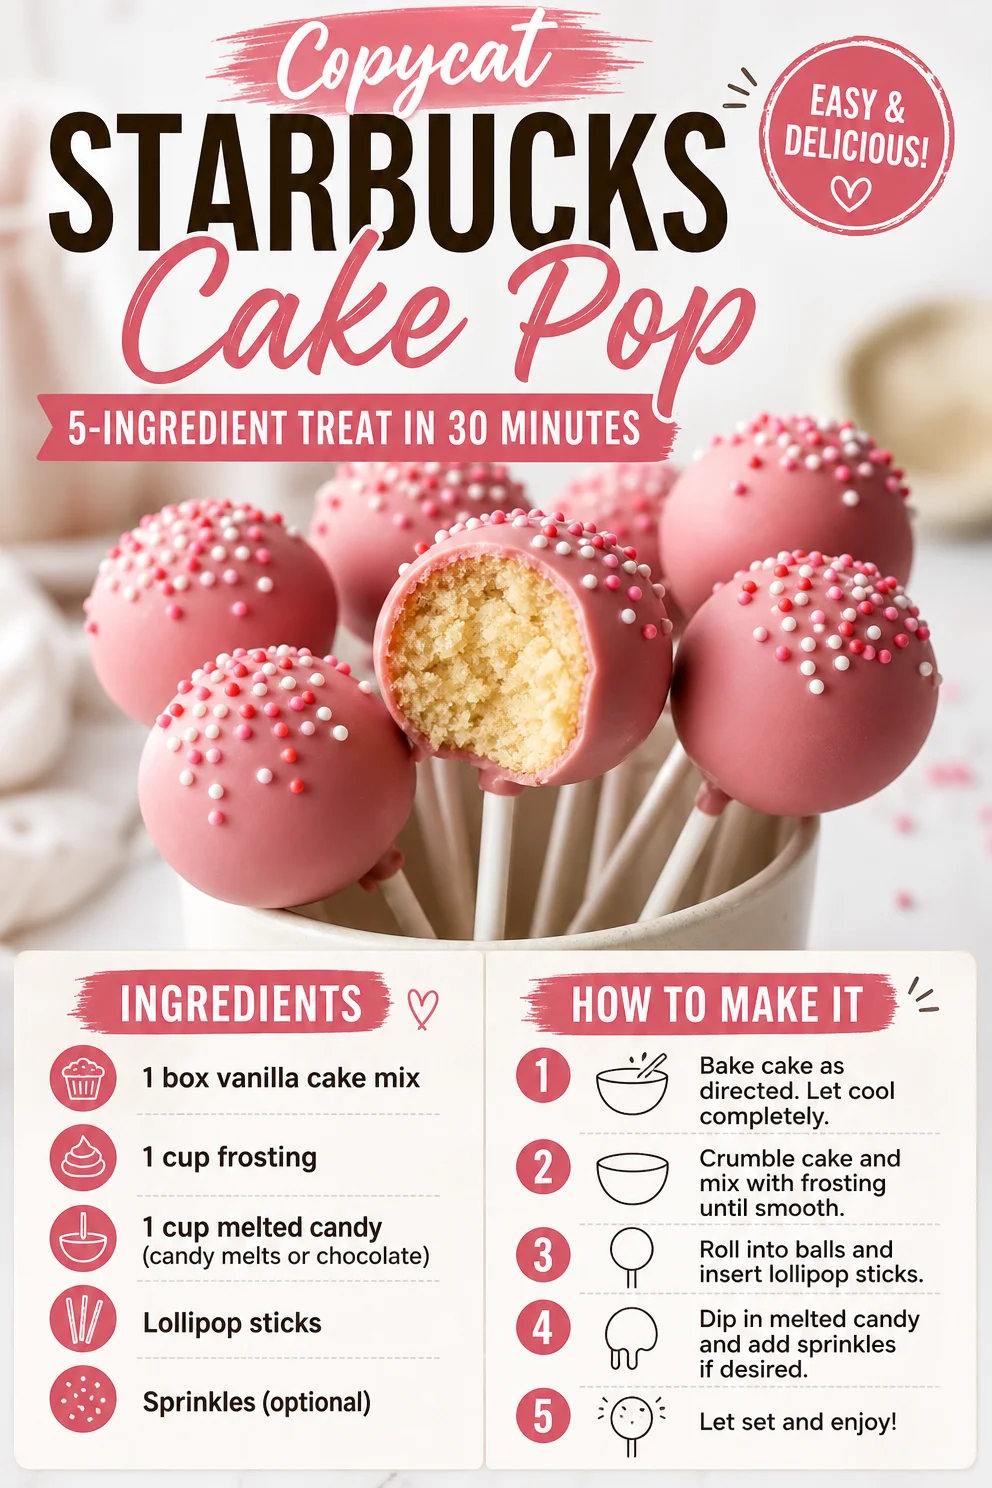
1 box vanilla cake mix: This will serve as the base of your cake pops. You can also opt for chocolate, red velvet, or any flavor you adore.
-
1 cup frosting: Store-bought or homemade, frosting adds moisture and sweetness. If you want a lighter option, consider a yogurt-based frosting or even cream cheese.
-
1 cup melted candy (candy melts or chocolate): This is what holds everything together and creates that luscious outer layer. Go for dark, milk, or white chocolate to suit your mood.
-
Lollipop sticks: Essential for that classic pop look. You can use candy sticks for a whimsical twist.
-
Sprinkles (optional): Add a burst of color and texture! Feel free to mix and match flavors or use crushed nuts for an adult twist.
Step-by-Step Instructions
Now that we have our ingredients, let’s get down to the real fun—making these delightful cake pops!
Step 1: Bake the Cake
- Preheat your oven according to the cake mix instructions. Follow the package directions to bake your cake in a 9×13-inch pan.
- Once baked, let the cake cool completely. This step is vital to ensure that your cake doesn’t crumble when combining with frosting. (Pro tip: Chill it in the fridge for about 30 minutes for easier handling!)
Step 2: Crumble and Combine
- In a large bowl, crumble the cooled cake into fine crumbs. You can use your hands or a fork—whichever you prefer!
- Add your chosen frosting to the crumbled cake. Start with half a cup and mix well. You’re aiming for a dough-like consistency that holds together but isn’t overly sticky. If it’s too dry, add more frosting a tablespoon at a time.
Step 3: Form the Pops
- Grab a small amount of the cake mixture and roll it into a ball about the size of a tablespoon. Place the formed balls onto a baking sheet lined with parchment paper. Repeat until all the mixture is rolled up.
Step 4: Chill the Cake Balls
- Pop the baking sheet into the refrigerator for about 15-30 minutes. Chilling them will help them hold their shape when you dip them in the chocolate.
Step 5: Melt the Candy
- While the cake balls chill, melt your candy as per the package instructions. You can use the microwave or a double boiler. If the mixture seems too thick, add a teaspoon of vegetable oil to thin it out a bit.
Step 6: Dip and Decorate
- Once your cake balls are chilled, dip the tip of a lollipop stick into the melted candy, then insert it into the cake ball. This acts as glue to keep the stick anchored.
- Dip the entire cake pop into the melted candy and let the excess drip off. Before the chocolate hardens, sprinkle your decorations on top.
Step 7: Set the Pops
- Stick the pops upright into a piece of Styrofoam or a cake pop stand to allow them to dry completely.
Step 8: Enjoy!
- Once the chocolate has set, they’re ready to serve. Try not to eat them all at once—though I won’t judge if you do!
Serving Suggestions
When it comes to serving your cake pops, presentation is key! Arrange them in a fun pop holder or a decorative mug for playful vibes. For a cozy movie night, serve them on a cake stand alongside a selection of your favorite snacks. You can also wrap them in colorful cellophane and tie them with a ribbon for delightful party favors!
Recipe Variations
Now that you’ve mastered the classic version, why not mix it up a bit? Here are some tasty ideas to try:
-
Chocolate Mint: Use chocolate cake mix and mint chocolate frosting for a refreshing twist.
-
Spiced Pumpkin: Switch your vanilla frosting for cream cheese frosting and incorporate pumpkin spice cake mix for seasonal flavors.
-
Peanut Butter Bliss: Add a tablespoon of peanut butter into the cake mixture and drizzle melted peanut butter on top instead of traditional frosting.
-
Almond Joy: Mix in shredded coconut and chopped almonds to the cake mix for tropical goodness and cover with chocolate.
-
Lavender Lemonade: Infuse your frosting with a few drops of lemon extract and a hint of dried lavender for a sophisticated sweet.
Chef’s Notes
Every time I whip up these cake pops, I’m reminded of my first attempt, which was a total disaster! 😂 I inadvertently baked them too long, leaving them dry. But, with a bit of frosting magic, they transformed from a crumbly mess to delightful bites of bliss. This recipe reminds me that kitchen adventures sometimes go awry, but the best creations come from experimentation and a little improvisation.
FAQs and Troubleshooting
Q1: Why did my cake pops crack?
A: Cake pops can crack if they’re either too dry or if the candy coating is too thick. Ensure your cake mixture is well-combined and add a bit of oil to your candy melts if they seem too thick!
Q2: How can I keep the cake balls from falling off the sticks?
A: Be sure to chill the cake balls sufficiently before dipping them. Dipping the lollipop stick in candy before inserting it into the cake ball also helps create a solid bond.
Q3: Can I freeze the cake pops?
A: Absolutely! Freeze them on a baking sheet first, then transfer to a ziplock bag for long-term storage. When you’re ready to enjoy, just let them thaw at room temperature!
Q4: My candy coating isn’t smooth. What should I do?
A: If your coating has clumped up, try adding a teaspoon of vegetable oil to the melted chocolate or candy melts to achieve a smoother consistency.
Nutritional Info
(For those who are curious about nutritional information, here’s a quick breakdown based on a standard cake pop if you choose to make modifications!)
- Calories: Approximately 150 kcal per pop
- Protein: 2g
- Carbohydrates: 20g
- Fat: 6g
So, there you have it—a guide to creating your very own Starbucks Cake Pops right at home! I hope you dive into this adventure and enjoy every moment spent crafting these delightful bites. Whatever flavors you choose, remember to have fun and make the kitchen your happy place. Happy baking! 💛
PrintStarbucks Cake Pops

Create your own delicious Starbucks-inspired Cake Pops easily at home with this fun and interactive recipe!
- Prep Time: 30 minutes
- Cook Time: 30 minutes
- Total Time: 60 minutes
- Yield: 20 servings 1x
- Category: Dessert
- Method: Baking
- Cuisine: American
- Diet: Vegetarian
Ingredients
- 1 box vanilla cake mix
- 1 cup frosting
- 1 cup melted candy (candy melts or chocolate)
- Lollipop sticks
- Sprinkles (optional)
Instructions
- Preheat your oven according to the cake mix instructions.
- Follow the package directions to bake your cake in a 9×13-inch pan.
- Let the cake cool completely. (Pro tip: Chill it in the fridge for about 30 minutes for easier handling!)
- Crumble the cooled cake into fine crumbs in a large bowl.
- Add your chosen frosting to the crumbled cake and mix well until you reach a dough-like consistency.
- Grab a small amount of the mixture and roll it into a ball about the size of a tablespoon.
- Place the formed balls onto a baking sheet lined with parchment paper and repeat until all the mixture is rolled up.
- Pop the baking sheet into the refrigerator for about 15-30 minutes to chill.
- Melt your candy as per the package instructions.
- Dip the tip of a lollipop stick into the melted candy and insert it into the cake ball.
- Dip the entire cake pop into the melted candy and let the excess drip off.
- Stick the pops upright into a piece of Styrofoam or a cake pop stand to allow them to dry completely.
- Enjoy your delicious cake pops once the chocolate has set!
Notes
Experiment with different flavors and toppings for unique cake pops!
Nutrition
- Serving Size: 1 pop
- Calories: 150
- Sugar: 12g
- Sodium: 50mg
- Fat: 6g
- Saturated Fat: 3g
- Unsaturated Fat: 2g
- Trans Fat: 0g
- Carbohydrates: 20g
- Fiber: 0g
- Protein: 2g
- Cholesterol: 30mg
Keywords: cake pops, Starbucks recipe, dessert, sweet treat, baking