Easy 4th of July Red, White & Blue Marble Cake Recipe
As the summer sun starts to shine a little brighter, we know what’s coming: one of our most cherished celebrations, the 4th of July! It’s a time filled with barbecue smoke, laughter, fireworks, and of course, delicious food. This year, let’s take your dessert game to a whole new level with an easy, festive Red, White & Blue Marble Cake that will wow your friends and family without spending hours in the kitchen.
Imagine the scene: you’ve got the grill going, the kids are splashing in the pool, and everyone is eagerly anticipating the highlight of the day – dessert! This cake is not only visually stunning with its vibrant patriotic colors, but it’s also unbelievably delicious and fluffy, making each bite a delightful experience. Plus, this marble cake is a fun way to show off your baking skills while keeping things simple.
But wait, there’s more! You won’t have to go to war with your kitchen because this recipe is straightforward and designed for real-life bakers like you and me. I promise you’re going to want to keep this recipe in your back pocket for years to come.
So let’s roll up our sleeves, put on our favorite apron, and dive into this delightful, tasty adventure that’s all about celebrating the flavors of independence!
Personal Story
When I think back to my childhood 4th of July celebrations, I can almost hear the sizzling grill and smell the fireworks in the air. Growing up, my family had a tradition of hosting the neighborhood barbecue. We would gather in the backyard, everyone bringing their favorite dish to share. While the barbecue ribs and corn on the cob were crowd-pleasers, it was the dessert table that truly stole the show—especially my mom’s famous marble cake!
I’d watch in awe as she carefully swirled those brilliant reds, whites, and blues into the batter, creating a masterpiece that mirrored our flag. Each bite was a delightful experience, bursting with flavor and memories, and I can still see the smiles on everyone’s faces as they took that first bite. It was more than just a cake; it was love baked into every layer, tying us all together in celebration.
Years later, it became my mission to recreate that same magic and joy of baking. Whether it’s at a summer barbecue or just a cozy night with friends, this cake has become a staple in my kitchen. I can’t wait to share this easy, scrumptious recipe with you, so let’s get started!
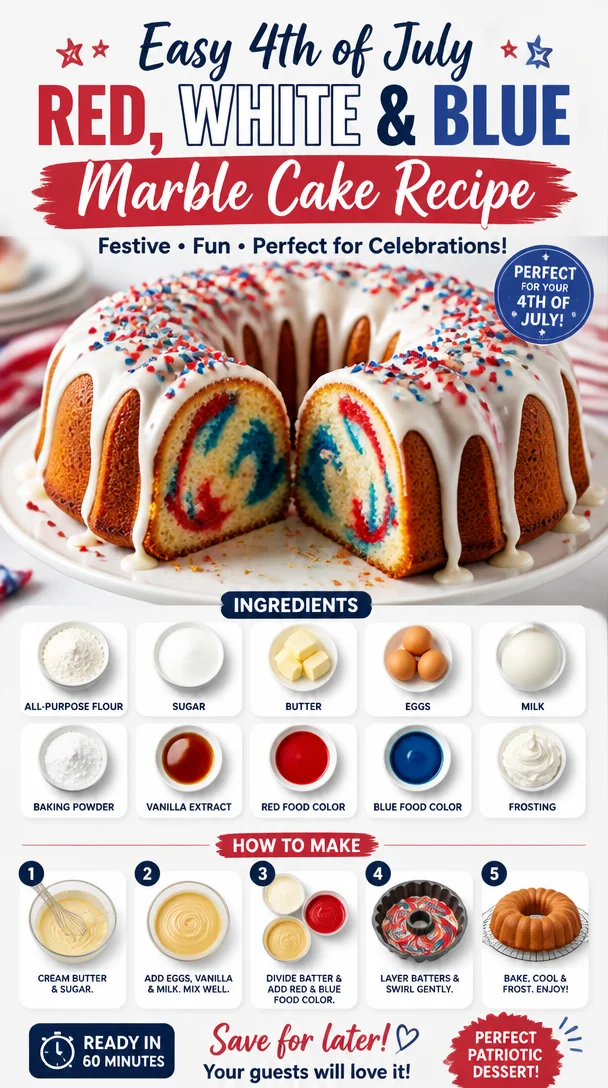
Ingredients
To whip up this delightful Red, White & Blue Marble Cake, you’ll need the following ingredients:
-
1 ¾ cups all-purpose flour: A staple in every baking recipe, flour is the base of our cake. For a gluten-free version, you can substitute it with gluten-free all-purpose flour.
-
1 tablespoon baking powder: This will help our cake rise beautifully. Make sure it’s fresh for the best results!
-
½ teaspoon salt: Just a pinch to balance out the sweetness.
-
¾ cup unsalted butter, softened: This adds richness and flavor. If you’re dairy-free, try using coconut oil or a vegan butter substitute.
-
1 ½ cups granulated sugar: Sweetness is essential! Consider using coconut sugar for a healthier option.
-
3 large eggs: Eggs contribute to the cake’s structure and moisture. For an egg-free version, you can use flaxseed eggs—mix one tablespoon of ground flaxseed with three tablespoons of water and let it sit until thickened.
-
1 teaspoon vanilla extract: For that wonderful aroma and flavor. Almond extract can also be a lovely alternative if you want to switch it up a bit!
-
1 cup buttermilk: This adds moisture and a light tang; you can easily make your own by combining a cup of milk with a tablespoon of vinegar or lemon juice.
-
Red gel food coloring: For our vibrant red layer. Liquid food coloring will also work, just be mindful of the amount since it can alter the cake’s consistency.
-
Blue gel food coloring: Same as above, but for the blue layer!
Step-by-Step Instructions
Now, let’s dive into the fun part—baking this beauty! Follow these steps:
-
Preheat Your Oven: Begin by preheating your oven to 350°F (175°C). This ensures an even bake. Don’t skip this step—no one likes a dense cake!
-
Prepare Your Pans: Grease and flour two 9-inch round cake pans. You can also line the bottoms with parchment paper for an easier release. A little trick is to use cooking spray with flour; it works wonders!
-
Combine Dry Ingredients: In a large mixing bowl, whisk together the flour, baking powder, and salt. This helps distribute the leavening agent evenly throughout the flour, which will give your cake a lovely rise.
-
Cream the Butter and Sugar: In another bowl, beat the softened butter and sugar together until light and fluffy, about 3-5 minutes. This aeration creates a soft texture, crucial for a moist cake.
-
Add the Eggs and Vanilla: Next, add the eggs one at a time, mixing well after each addition. Pour in the vanilla extract, and mix until combined. It should smell heavenly!
-
Incorporate Dry Ingredients and Buttermilk: Gradually add in your flour mixture, alternating with the buttermilk. Begin and end with the dry, mixing until just combined. Overmixing can lead to a tough cake, so be gentle!
-
Divide the Batter: Now, divide the batter evenly into three separate bowls. Keep one bowl plain; color the second bowl with red gel food coloring, and the third with blue gel food coloring. Aim for deep, vibrant shades!
-
Create the Marble Effect: Scoop dollops of each color into the prepared pans, taking turns to add spoonfuls of red, white, and blue batter. Use a butter knife or skewer to gently swirl the colors together. Don’t overdo it—too much swirling can mix the colors instead of creating a marble effect.
-
Bake the Cakes: Place the pans in the preheated oven and bake for 25-30 minutes or until a toothpick inserted in the center comes out clean. You’ve got this!
-
Cool: Once baked, remove the pans from the oven and let them cool in the pans for about 10 minutes. Then, transfer the cakes onto a wire rack to cool completely before frosting.
-
Frost Your Cake: Once cooled, layer the cakes and frost with your favorite vanilla buttercream or cream cheese frosting. You can add more decorative red and blue sprinkles for that festive touch.
Serving Suggestions
When it comes to serving this delicious Red, White, and Blue Marble Cake, presentation is key! Stack the layers for a tall cake, and don’t hold back on that frosting. Consider garnishing each slice with fresh berries—strawberries and blueberries not only add to the patriotic theme but enhance the visual appeal as well! Serve chilled with a scoop of vanilla ice cream for a refreshing finish to your summer celebration.
Recipe Variations
Now that you have the base recipe down, here are some fun ideas to switch things up:
-
Chocolate Variation: Replace a portion of the flour with cocoa powder to create a chocolate marble cake. Swirl in chocolate batter along with the red and blue for a decadent twist!
-
Fruit Additions: Incorporate zesty lemon or orange zest into the batter for a refreshing citrus kick. It pairs especially well with the fluffy texture of the cake.
-
Nuts: Add chopped nuts (like pecans or walnuts) to the batter for extra texture.
-
Cake Jars: For a fun and festive serving option, layer the cake pieces in jars with whipped cream and berries for a portable dessert everyone will enjoy.
-
Cupcakes: Turn this recipe into charming cupcakes by adjusting the baking time to 18-20 minutes in a muffin tin. Perfect for individual servings at your celebration!
Chef’s Notes
From my experiences in the kitchen, I can tell you that baking is all about love and creativity. The best part about this Red, White & Blue Marble Cake? It’s forgiving! If you mess up a swirl or two, embrace it; that makes it uniquely yours. Plus, I remember one time I got so caught up in the excitement that I accidentally added double the baking powder, and it turned out to be the lightest cake I’ve ever made! Kitchen oopsies can sometimes lead to unexpected delights. So let your kitchen adventures blossom!
FAQs and Troubleshooting
1. My cake came out dense. What did I do wrong?
This could be due to overmixing the batter or using expired leavening agents. Be sure to mix gently after adding flour, and always check the expiry date of your baking powder!
2. How can I prevent my cake from sticking to the pan?
Greasing and flouring the pans adequately or using parchment paper are your best bets. You can also use a cooking spray designed for baking, which can save you time and hassle.
3. Can I make the batter in advance?
While it’s best to bake this cake fresh, you can prepare the batter and refrigerate it for a short period (max 24 hours). Just bring it back to room temperature before baking.
4. What frosting pairs best with this cake?
A classic vanilla buttercream or cream cheese frosting works beautifully, but feel free to experiment with flavored creams, such as berry or chocolate ganache—delicious!
Nutritional Info
This cake serves about 12, and here’s a rough estimate of the nutritional content per slice:
- Calories: 300
- Protein: 3g
- Carbohydrates: 42g
- Fat: 12g
- Sugar: 20g
Keep in mind that nutritional content may vary based on specific ingredients and portion sizes!
Now, armed with this scrumptious recipe, go ahead and make your 4th of July celebration a memorable one, filled with delightful flavors and heartwarming moments. I can’t wait to see your creations, so don’t forget to share your photos with me! Happy baking! 🎉🎂✨
PrintEasy 4th of July Red, White & Blue Marble Cake
A festive and visually stunning Red, White & Blue Marble Cake perfect for 4th of July celebrations, combining delicious flavors and easy baking steps.
- Prep Time: 15 minutes
- Cook Time: 30 minutes
- Total Time: 45 minutes
- Yield: 12 servings 1x
- Category: Dessert
- Method: Baking
- Cuisine: American
- Diet: Vegetarian
Ingredients
- 1 ¾ cups all-purpose flour
- 1 tablespoon baking powder
- ½ teaspoon salt
- ¾ cup unsalted butter, softened
- 1 ½ cups granulated sugar
- 3 large eggs
- 1 teaspoon vanilla extract
- 1 cup buttermilk
- Red gel food coloring
- Blue gel food coloring
Instructions
- Preheat your oven to 350°F (175°C).
- Prepare two 9-inch round cake pans by greasing and flouring them.
- Combine the flour, baking powder, and salt in a large mixing bowl.
- Cream the softened butter and sugar together until light and fluffy.
- Add the eggs one at a time, mixing well after each addition, then pour in the vanilla extract.
- Incorporate the flour mixture alternately with the buttermilk until just combined.
- Divide the batter into three separate bowls, keeping one plain and coloring the others with red and blue gel food coloring.
- Create the marble effect by scooping dollops of each color into the prepared pans and swirling them with a knife.
- Bake for 25-30 minutes or until a toothpick inserted comes out clean.
- Cool the cakes in the pans for about 10 minutes before transferring to a wire rack to cool completely.
- Frost with your favorite frosting and add decorative sprinkles if desired.
Notes
Consider garnishing slices with fresh berries and serving chilled with vanilla ice cream for a refreshing finish.
Nutrition
- Serving Size: 1 slice
- Calories: 300
- Sugar: 20g
- Sodium: 200mg
- Fat: 12g
- Saturated Fat: 7g
- Unsaturated Fat: 3g
- Trans Fat: 0g
- Carbohydrates: 42g
- Fiber: 0g
- Protein: 3g
- Cholesterol: 80mg
Keywords: 4th of July, marble cake, patriotic dessert, summer dessert, festive cake