
Spooktacular Halloween Chocolate Chip Cookies
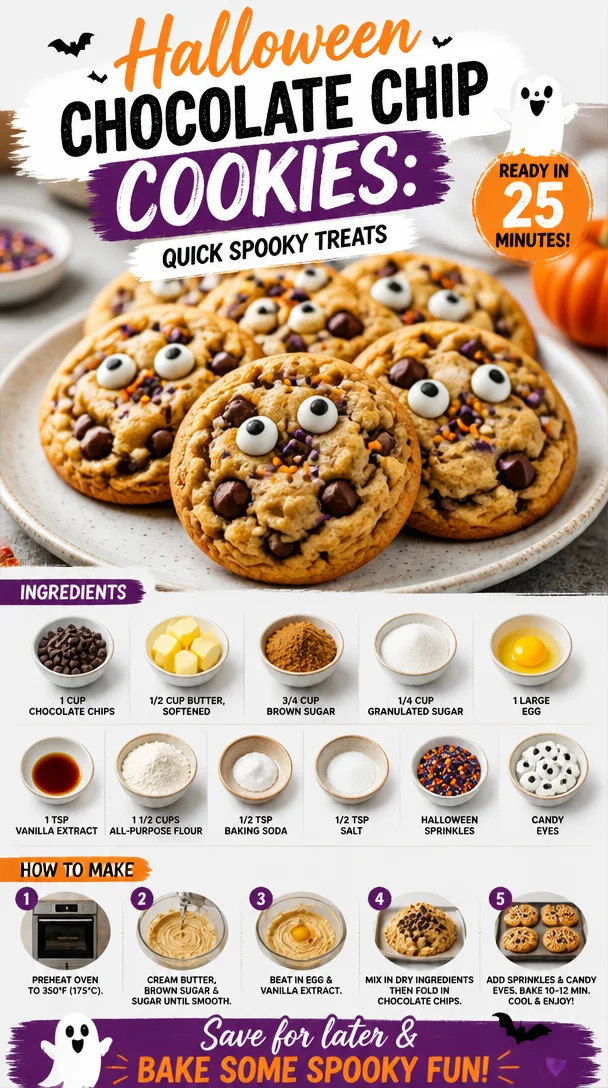
Halloween is right around the corner, and you know what that means—time for pumpkin carving, costume planning, and indulging in all the deliciously spooky treats! But let’s face it, nothing beats the classic chocolate chip cookie. They’re warm, gooey, and full of chocolatey goodness, plus we can easily give them a Halloween twist! Now, what could be better than baking up a batch of vibrant Halloween Chocolate Chip Cookies? Whether you’re hosting a Halloween party or just looking to whip up a batch for some cozy fall evenings, these cookies promise to be a hit!
I remember the first time I made Halloween cookies with my little cousin. We rolled the dough into fun shapes, coated them in colorful sprinkles, and joyfully threw candy eyes on top. We created cookie monsters and jack-o’-lanterns right in our kitchen! The laughter, the gooey mess of chocolate, and the fragrant smell wafting from the oven remains one of my fondest memories. Fast forward to today, and I still adore experimenting with cookies. Each batch is an opportunity for creativity, and this Halloween, it’s time to step up our game with some spooky fun.
These Halloween Chocolate Chip Cookies will add flair to your festivities, and trust me, everyone in your circle of friends (and those little trick-or-treaters knocking on your door) will gobble them up in no time. Let’s dust off our aprons, channel our inner ghosts and goblins, and get baking!
Ingredients
To create these mouthwatering cookies, you’ll need the following ingredients:
-
1 cup chocolate chips
Choose your favorite variety—semi-sweet, dark, milk, or even white chocolate! You can also swap in seasonal flavors, like pumpkin spice chips, if you’re feeling adventurous. -
1/2 cup butter, softened
Make sure your butter is room temperature; this helps create a softer, fluffier cookie. If you’re out of butter, coconut oil or applesauce can work as a substitute but might alter the texture a bit. -
3/4 cup brown sugar
Brown sugar adds a lovely depth of flavor and chewiness. If you’re running low, you can use granulated sugar instead; the cookies just won’t have that rich caramel-like taste. -
1/4 cup granulated sugar
For sweetness that lights up the flavor! It balances perfectly with the brown sugar. You can also use a sugar substitute if you’re trying to cut back on sugar. -
1 large egg
This binds all our ingredients together and gives a nice richness to the cookies. For a vegan alternative, try using flaxseed meal mixed with water. -
1 tsp vanilla extract
Pure vanilla extract elevates the flavor to a whole new level, giving your cookies that homemade warmth. If you want a nutty flavor, consider using almond extract instead. -
1 1/2 cups all-purpose flour
The backbone of any cookie recipe! For a gluten-free option, almond flour or a gluten-free all-purpose blend could work. -
1/2 tsp baking soda
This will help your cookies rise and stay soft and chewy! If you’re fresh out, baking powder could be a substitute (just use a little more). -
1/2 tsp salt
A pinch of salt balances the sweetness beautifully. If you’re on a low-sodium diet, you can skip it, but I advise giving it a try at least once! -
Halloween sprinkles
Get creative with fun colors and spooky shapes! Sprinkles give a festive flair, so go wild! -
Candy eyes
These adorable little decorations bring our cookies to life! You could swap these out for nuts or other candies if you’re not feeling the eyes.
Now that we’ve gathered our ingredients, let’s talk about the thrill of bringing them together in a delightful bake-off!
Step-by-Step Instructions
-
Preheat that Oven: Set your trusty oven to 350°F (175°C). A hot oven is essential for perfectly baked cookies with a lovely golden edge!
-
Cream the Butter and Sugars: In a large bowl, combine your softened butter, brown sugar, and granulated sugar. Using a hand mixer or whisk, beat them together until the mixture is light and fluffy. This magic takes about 2-3 minutes! It’s crucial as it incorporates air, making your cookies soft and chewy!
-
Add the Egg and Vanilla: Crack in the egg and pour in that luscious vanilla extract. Mix everything until well combined. Think of this as uniting flavors—your future cookies will thank you!
-
Combine Dry Ingredients: In another bowl, whisk together the all-purpose flour, baking soda, and salt. This helps evenly distribute the dry ingredients, preventing lumps in your cookie dough—no one wants chewy clumps!
-
Mix It Up: Gradually add the dry ingredients to the butter-sugar mixture. Use a spatula or wooden spoon to fold them in gently. Don’t over-mix—turning your dough into a tough mess isn’t our goal here!
-
Chocolate Chips, Please: Stir in the chocolate chips, ensuring they are evenly distributed throughout the dough. If you’re feeling generous, toss in a handful more for the chocolate lovers among us!
-
Scoop the Dough: Using a cookie scoop or two spoons, drop balls of dough onto a lined baking sheet. Leave ample space between each ball, as they will spread while baking!
-
Add Halloween Spirit: Before popping them into the oven, sprinkle those Halloween sprinkles on top of each cookie. And don’t forget to add candy eyes for that spooky touch!
-
Bake to Perfection: Place the cookie sheet in your preheated oven and bake for 10-12 minutes, or until the edges are golden but the centers still look slightly under-baked. They will set as they cool!
-
Cool Down: Allow cookies to cool on the baking sheet for about 5 minutes before transferring them to a wire rack. This is a crucial step—you want them to stay soft and chewy!
Now, your kitchen is filled with the heavenly aroma of fresh-baked cookies, and it’s time to enjoy the fruits of your labor!
Serving Suggestions
When serving, consider stacking the cookies on a festive plate or a Halloween-themed tiered stand for added visual appeal. You could also set up a DIY cookie decorating station with extra sprinkles, frosting, and edible decorations for kids (and adults!) to customize their own cookies. It’s a fun way to engage with guests and get everyone in the Halloween spirit!
Recipe Variations
Feeling a little adventurous? Here are a few twists to make these cookies your own:
- Pumpkin Spice Cookies: Add a cup of pumpkin puree and a teaspoon of pumpkin spice for an autumn-inspired delight.
- Nutty Chocolate Chip Cookies: Fold in chopped walnuts or pecans along with the chocolate chips for an irresistible crunch.
- Spooky Orange Flavor: Add a teaspoon of orange zest and swap in white chocolate chips for a citrusy twist that’ll brighten up your Halloween spread!
- Ghostly Glaze: Once cooled, drizzle melted white chocolate over the cookies to create a ghostly effect!
Chef’s Notes
Over the years, my cookie recipes have evolved just like my taste buds. I used to make plain cookies without a thought of fun add-ins. Now, every cookie session is a chance to relive memories and get fun with flavors. I have had my fair share of flops and incredible wins in the kitchen, and one of my funniest moments was when a batch of cookies accidentally turned into a giant chocolate chip pancake because I used too much butter!
The best part about baking cookies is sharing them with friends and family, which creates more memories while enjoying good food together.
FAQs and Troubleshooting
-
Why are my cookies spreading too much?
If your cookies are spreading too much, your butter may have been too warm, or you may have skipped the refrigeration process. Try chilling the dough in the refrigerator for about 30 minutes before baking it! -
How do I know when my cookies are done?
Perfectly baked cookies should be golden on the edges with slightly soft centers. Don’t worry if they look a bit underbaked—they will continue to cook on the baking sheet! -
My cookies are too hard! What went wrong?
Hard cookies usually mean overmixing or overbaking. Remember not to mix the dough too much and keep an eye on the baking time! -
Can I freeze the cookie dough?
Absolutely! You can freeze the cookie dough before baking for up to 2 months. Just scoop the dough onto baking sheets, flash freeze them, and then transfer to an airtight container. When you’re ready to bake, just add a couple of extra minutes to the bake time!
Nutritional Info
While I believe in enjoying cookies in moderation, here’s a quick overview for those interested in keeping track:
- Servings per recipe: About 24 cookies
- Calories per cookie: Approximately 120 (this can vary based on exact ingredients used)
Transforming those classic chocolate chip cookies into something spooky and festive is not just fun—it’s delicious! Gather your ingredients, channel your inner baker, and let the magic unfold in your kitchen. Happy Halloween baking, and may your cookies be the talk of the town! 💛👻🍪
PrintSpooktacular Halloween Chocolate Chip Cookies
Deliciously spooky Halloween Chocolate Chip Cookies, perfect for festive gatherings.
- Prep Time: 15 minutes
- Cook Time: 12 minutes
- Total Time: 27 minutes
- Yield: 24 cookies 1x
- Category: Dessert
- Method: Baking
- Cuisine: American
- Diet: Vegetarian
Ingredients
- 1 cup chocolate chips
- 1/2 cup butter, softened
- 3/4 cup brown sugar
- 1/4 cup granulated sugar
- 1 large egg
- 1 tsp vanilla extract
- 1 1/2 cups all-purpose flour
- 1/2 tsp baking soda
- 1/2 tsp salt
- Halloween sprinkles
- Candy eyes
Instructions
- Preheat the oven: Set your oven to 350°F (175°C).
- Cream the butter and sugars: In a large bowl, combine butter, brown sugar, and granulated sugar until light and fluffy.
- Add the egg and vanilla: Mix in the egg and vanilla extract until well combined.
- Combine dry ingredients: In another bowl, whisk together flour, baking soda, and salt.
- Mix it up: Gradually add dry ingredients to the butter-sugar mixture, folding gently.
- Stir in the chocolate chips until evenly distributed.
- Scoop the dough: Drop balls of dough onto a lined baking sheet.
- Add Halloween spirit: Sprinkle Halloween sprinkles on top and add candy eyes.
- Bake to perfection: Bake for 10-12 minutes until edges are golden.
- Cool down: Allow cookies to cool on a baking sheet for about 5 minutes before transferring to a wire rack.
Notes
Feel free to customize the cookies with different flavors or decorations for a unique twist!
Nutrition
- Serving Size: 1 cookie
- Calories: 120
- Sugar: 9g
- Sodium: 75mg
- Fat: 6g
- Saturated Fat: 4g
- Unsaturated Fat: 2g
- Trans Fat: 0g
- Carbohydrates: 15g
- Fiber: 0g
- Protein: 1g
- Cholesterol: 15mg
Keywords: Halloween, cookies, chocolate chip, dessert, festive, spooky, baking