
Red, White and Blue Pinwheel Icebox Cookies: A Delicious and Festive Treat
Hello, cookie lovers! 🌟 It’s Sophie here, and today we’re diving into a delightful recipe that not only tastes amazing but also adds a pop of color to your dessert table: Red, White and Blue Pinwheel Icebox Cookies! Whether you’re hosting a summer barbecue, a Fourth of July celebration, or simply craving something sweet with a patriotic flair, these cookies are sure to dazzle your taste buds and impress your friends and family.
Imagine biting into a soft cookie with swirls of vibrant red and blue, perfectly complemented by a buttery vanilla flavor. These cookies are a lovely way to celebrate without sacrificing flavor or enjoyment. And let me tell you, they are super simple to make! So grab your apron and let’s get started on these scrumptious delights that you’ll be excited to whip up again and again.
Personal Story
I’ll never forget the first time I encountered pinwheel cookies. I was just a kid, visiting my grandmother during summer break. She’d pull an enormous baking sheet out of the oven, and as the warm cookies cooled on the counter, my siblings and I would rush in to sneak a piece (or three). The way the vibrant colors danced together always captivated me. I remember asking her how she made them, and she chuckled, saying it was all about having a little fun with her dough.
Years later, as I experimented in my own kitchen, I found myself reminiscing about those joyful moments. The smell of cookies baking, the laughter shared over still-warm treats, and the colorful swirls inspired me to create my own version: the Red, White, and Blue Pinwheel Icebox Cookies! Each bite brings back those childhood memories, and I can’t wait to share this easy and delightful recipe with you!
Ingredients
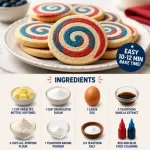
Here’s what you’ll need to whip up these stunning cookies:
-
1 cup unsalted butter, softened
The foundation of a rich cookie! Softened butter helps create that perfect dough consistency. If you’re out of unsalted butter, feel free to use salted butter but skip the added salt in the recipe. -
1 cup granulated sugar
Sweetness is key! This sugar helps to create a tender cookie. For a slightly healthier twist, you can use coconut sugar or a sugar substitute. -
1 large egg
Eggs help bind everything together. If you need an egg substitute, try a flax egg (1 tablespoon ground flaxseed mixed with 3 tablespoons water) for a vegan option. -
2 teaspoons vanilla extract
Vanilla brings incredible flavor to the cookies. If you want to mix it up, almond extract could add a delightful twist! -
3 cups all-purpose flour
The backbone of the cookie, creating structure and stability. For gluten-free cookies, feel free to swap in a 1:1 gluten-free flour blend. -
1 teaspoon baking powder
This little ingredient adds lift to your cookies, making them soft and chewy. -
1/4 teaspoon salt
Balances the sweetness of the sugar and enhances the flavors. -
Red and blue food coloring
The stars of our show! You can use gel food coloring for vibrant hues, or liquid food coloring if that’s what you have on hand. Always start with a small amount; you can add more for a deeper color.
Step-by-Step Instructions
Ready to bake some cookies? Here’s how to make your Red, White and Blue Pinwheel Icebox Cookies, step by step!
-
Cream the butter and sugar
In a large mixing bowl, beat the softened unsalted butter and granulated sugar together until the mixture becomes light and fluffy, about 2-3 minutes. This process incorporates air into the batter and is essential for creating that sought-after cookie texture! -
Add the egg and vanilla
Next, add in your egg and vanilla extract. Beat until everything is well incorporated, scraping down the sides of the bowl if needed. This helps ensure that there are no sticky lumps left behind. -
Combine dry ingredients
In a separate bowl, whisk together the flour, baking powder, and salt. Gradually add the dry mixture into the wet ingredients and mix until just combined. You want a soft dough, but avoid overmixing, which could make your cookies tough! -
Divide the dough
Now, divide your dough into three equal parts. This is where the fun begins! -
Color the dough
In one portion, add red food coloring until you achieve your desired shade. In the second portion, mix in blue food coloring. Leave the third portion as is—this will be your “white” layer. Use your hands to knead the food coloring into the dough; it can get messy, but that’s part of the fun! -
Roll out the dough
Lay out a piece of parchment paper or plastic wrap on a flat surface. Start with the white dough; roll it into a rectangle about 1/4-inch thick. -
Layer the colors
Next, layer the blue dough on top of the white layer, then top that with the red dough. Make sure to press down gently to flatten and stick them together. -
Roll into a log
Carefully lift one edge of the parchment and start rolling the dough into a log shape, making sure to roll tightly to keep everything intact. Roll it up tightly and twist the ends closed. -
Chill the dough
Place the log in the refrigerator for at least 1-2 hours, or until it’s firm. This step is crucial as it helps the cookies keep their shape while baking. -
Preheat the oven
Preheat your oven to 350°F (175°C). Line a baking sheet with parchment paper for easy cleanup. -
Slice the cookies
Once the dough is chilled, remove it from the fridge. Using a sharp knife, slice the log into 1/4-inch thick pieces. -
Bake
Place the slices on your prepared baking sheet, leaving some space between each cookie. Bake for about 12-15 minutes, or until the edges are lightly golden. Keep an eye on them; we want soft, chewy cookies! -
Cool and enjoy
Allow the cookies to cool on the baking sheet for a few minutes before transferring them to a wire rack to cool completely. This will give them time to set while maintaining that soft chewy center!
Serving Suggestions
Now that your cookies are all nice and cool, it’s time to serve them up! These vibrant Red, White, and Blue Pinwheel Icebox Cookies are perfect on their own, but you can elevate the presentation by stacking them on a festive plate or arranging them in a jar tied with a ribbon for an adorable gift! They look fabulous mixed with fresh fruit, or even alongside a big scoop of vanilla ice cream for a fun dessert platter.
Recipe Variations
Feeling creative? Here are a few twist ideas to make this recipe your own:
-
Chocolate Swirl: Instead of the second color layer being red or blue, try mixing in some cocoa powder to create a chocolate swirl cookie!
-
Sprinkles: Add some fun sprinkles to the dough before rolling it up for an extra pop of color and texture!
-
Nutty Addition: Fold in some chopped nuts (like walnuts or pecans) to give your cookies a delightful crunch.
-
Fruit Flavor: Substitute vanilla extract with lemon or orange extract for a zesty flavor.
-
Gluten-Free Option: Swap in a gluten-free flour blend for a gluten-free cookie that everyone can enjoy!
Chef’s Notes
These Red, White, and Blue Pinwheel Icebox Cookies are an evolution of my childhood favorite! I’ll be honest, my first attempts didn’t quite turn out as beautifully as I had hoped—the color blending was a bit chaotic! But each iteration was a blast and allowed me to learn! One time, I got too excited and accidentally mixed colors before rolling and ended up with tie-dye cookies instead—still delicious but not quite the visual I was aiming for. 😊
Baking is all about having fun, learning, and creating memories, whether they come from perfecting a recipe or embracing a baking “oops.” I hope you enjoy this recipe as much as I do!
FAQs and Troubleshooting
1. Why did my cookies spread too much?
That usually happens if the dough is too warm. Ensure to chill the dough thoroughly before slicing into rounds!
2. How do I store these cookies?
Store the cookies in an airtight container at room temperature for up to a week. If you want them to last longer, you can freeze the dough for up to a month for future baking!
3. Can I make these cookies ahead of time?
Absolutely! You can prepare the dough, roll it into a log, wrap it up, and store it in the fridge or freezer until you’re ready to slice and bake.
4. What if I don’t have parchment paper?
You can use a baking mat or grease the baking sheet lightly with butter or oil instead.
Nutritional Info
While I usually focus on the deliciousness and joy of cooking, it’s worth mentioning these cookies are a treat—wonderful in moderation! An average cookie contains approximately 150 calories, with a mix of carbohydrates, fats, and proteins.
And there you have it! A fun and festive recipe to celebrate any occasion while enjoying the deliciousness of homemade cookies. I hope you give these Red, White, and Blue Pinwheel Icebox Cookies a try in your kitchen. Remember, the best part of baking is sharing it with friends and family. Happy baking, and may your cookie adventures be as colorful and joyful as these delightful treats! 💙❤️
PrintRed, White and Blue Pinwheel Icebox Cookies
A delightful and colorful cookie recipe perfect for summer and festive occasions.
- Prep Time: 15 minutes
- Cook Time: 15 minutes
- Total Time: 135 minutes
- Yield: 24 servings 1x
- Category: Dessert
- Method: Baking
- Cuisine: American
- Diet: Vegetarian
Ingredients
- 1 cup unsalted butter, softened
- 1 cup granulated sugar
- 1 large egg
- 2 teaspoons vanilla extract
- 3 cups all-purpose flour
- 1 teaspoon baking powder
- 1/4 teaspoon salt
- Red and blue food coloring
Instructions
- Cream the butter and sugar together until light and fluffy.
- Add the egg and vanilla, mixing until well combined.
- Combine the dry ingredients in a separate bowl and gradually mix into the wet ingredients.
- Divide the dough into three parts.
- Color one part red, one part blue, and leave the third white.
- Roll out the white dough into a rectangle.
- Layer the blue dough on top of the white, followed by the red.
- Roll the layered dough into a log tightly.
- Chill the log in the refrigerator for 1-2 hours.
- Preheat the oven to 350°F (175°C).
- Slice the log into 1/4-inch thick pieces.
- Bake for 12-15 minutes until edges are lightly golden.
- Cool on a wire rack before serving.
Notes
These cookies can be stored in an airtight container at room temperature for up to a week or frozen for longer storage.
Nutrition
- Serving Size: 1 cookie
- Calories: 150
- Sugar: 9g
- Sodium: 50mg
- Fat: 7g
- Saturated Fat: 4g
- Unsaturated Fat: 2g
- Trans Fat: 0g
- Carbohydrates: 20g
- Fiber: 0g
- Protein: 2g
- Cholesterol: 20mg
Keywords: cookies, desserts, festive, Fourth of July, pinwheel cookies